

There are three companies who have been AMAZING for my business: Showit, PASS, and Pixifi. I cannot live without these three companies. Pixifi can have a bit of a learning curve. I’ve had a few dinners with local photographers to help them set up their Pixifi accounts, and I thought that maybe this blog post on Pixifi setup tips would be helpful for those wanting to try Pixifi but are frustrated with the learning curve! If you want to sign up for Pixifi, here’s a link:
https://www.pixifi.com/?r=7f5eb3
At the end of this LONG post, I’m giving away a THREE FREE MONTHS of Pixifi (worth nearly $150)!
The giveaway ends on 7/4/2013 at 12AM CST! Please SHARE!!
*********************************
The first time you log in, your dashboard will have a video and a to do list. I have found that the to do list is a great starting point, but when I have met with local photographers to help them set up their Pixifi, it makes a little more sense to delve a little deeper into certain sections and set it up in a slightly different order.
I’ll help you walk through Pixifi from the beginning in the order that makes the most sense to me. I’ll include a link for each part that I’m talking about, as well as screenshots to help you along the way so you can see how I have mine set up (minus some personal details that I’ve blurred out). At the end, I’ll show you how to book your clients using Pixifi!
BASIC SETUP | THE PREFERENCES
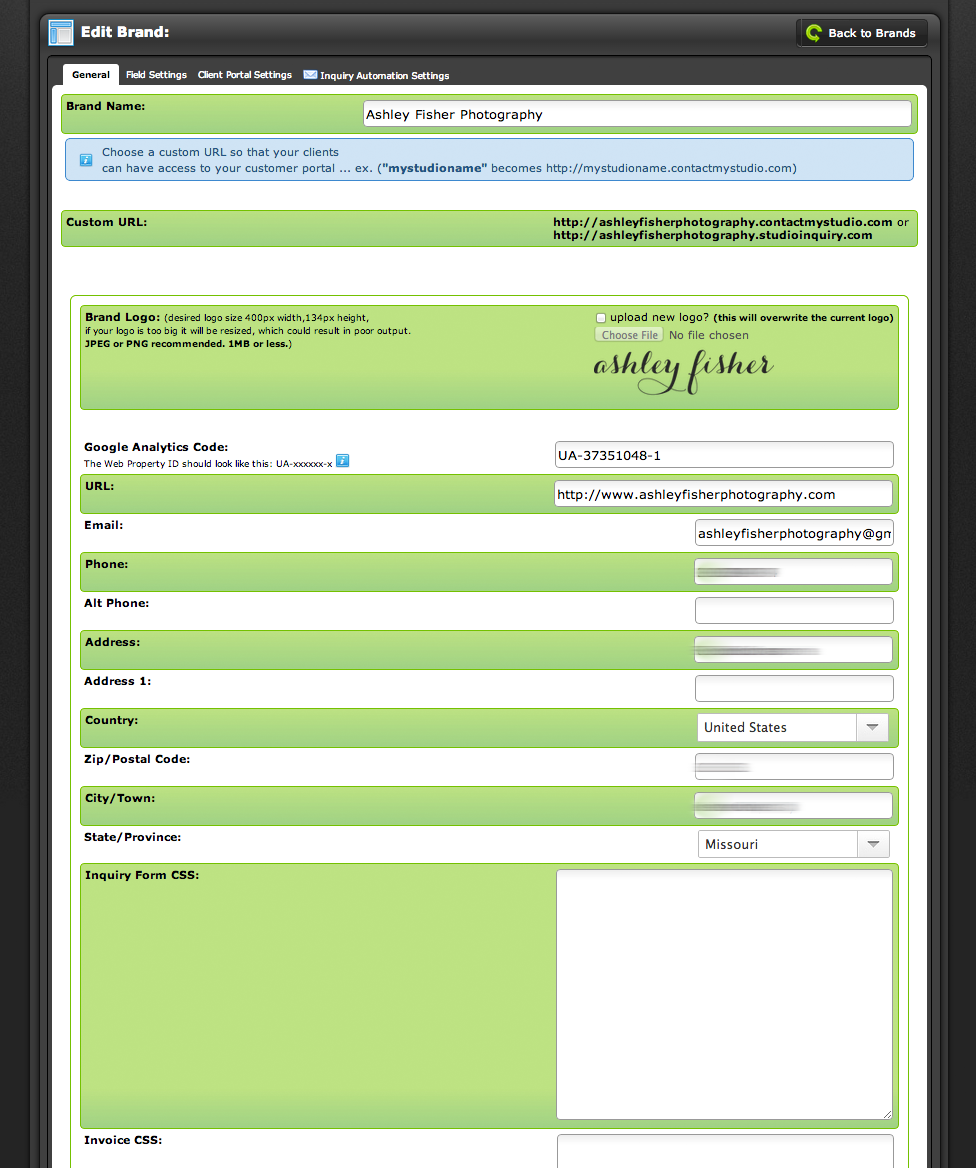
1. Creating Your Brand
GET THERE: https://www.pixifi.com/admin/settings/brands/ (or settings > brands)
You’ll want to click “create new brand” and name your brand. Once you click on your brand name, you’ll see a screen that looks like the one immediately below. I leave the CSS blocks blank…mainly because I have no idea how to use CSS. You’ll want to:
- fill out your brand name,
- choose a custom URL (and it’s not going to be a completely custom URL – it’ll be something like ashleyfisherphotography.contactmystudio.com)
- upload your logo (400px wide by 134px high; less than 1MB; jpg or png)
- fill out your google analytics code (if you don’t have one, sign up here: http://www.google.com/analytics/)
- and then fill out your contact info (website, email, phone, and address)
- click UPDATE at the bottom and mark this off your list!
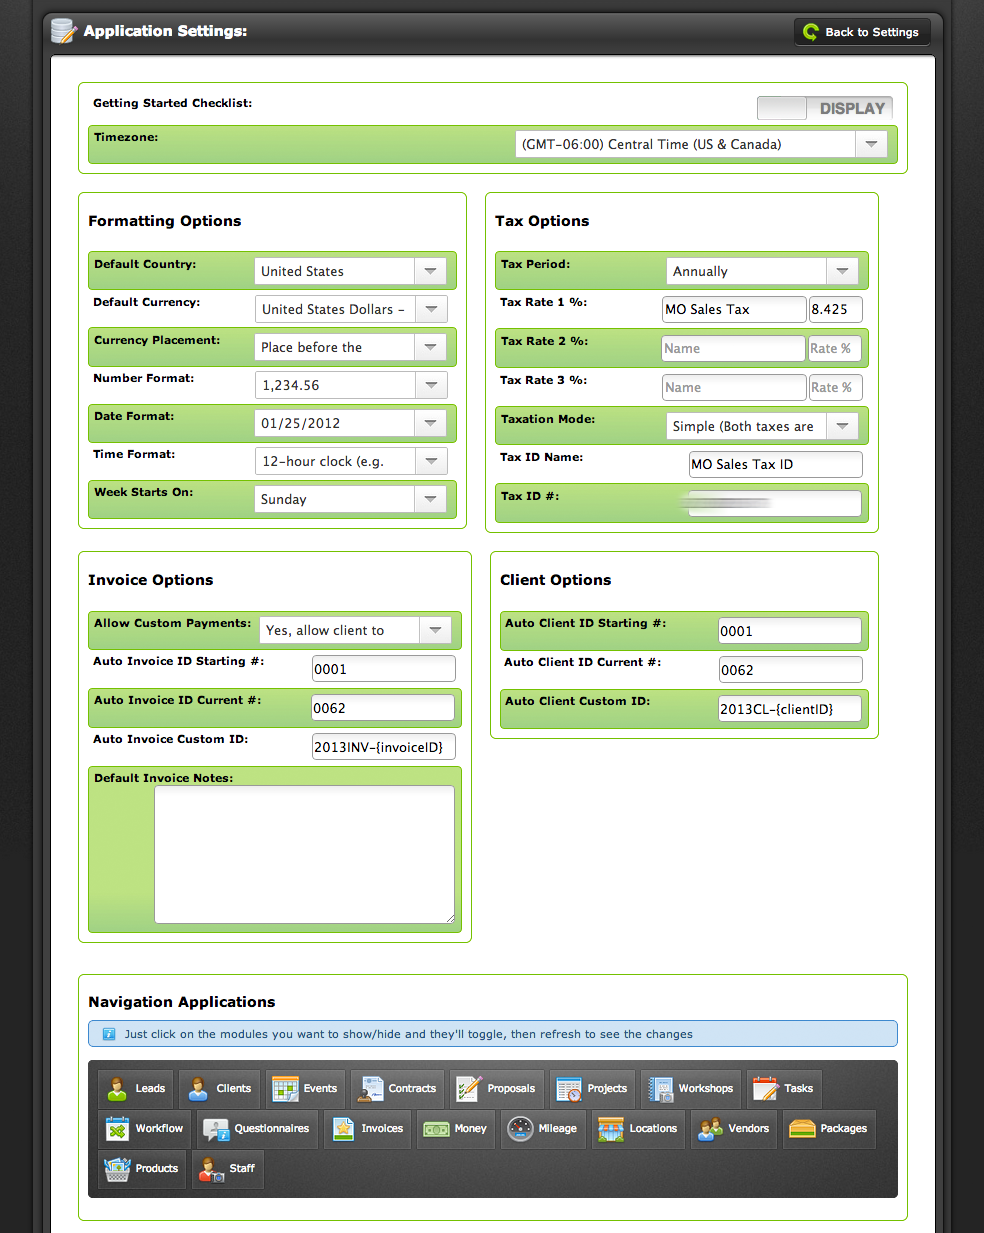
2. Application Settings
GET THERE: https://www.pixifi.com/admin/settings/app/ (or settings > application)
Your application settings is where you’ll setup your time zone, formatting preferences (currency, time format, calendar format, etc.), sales tax options/percentages, invoice + client naming options, as well as show/hide different pixifi modules. It’s pretty self explanatory, but a screenshot of how I have mine set up is below. The only thing that isn’t quite self-explanatory is allow custom payments. If you want your clients to be able to may interim payments, you need to select “yes,” and if you do NOT want them to be able to make interim payments, select “no.” Make sure you click update at the bottom!
3. Common Responses
GET THERE: https://www.pixifi.com/admin/settings/communication/ (or templates > communication > common responses)
Writing out individual emails, even if it seems quick, adds up to a LOT of time. If you’re not using TextExpander (which is a totally different topic), you should at least be using common responses! I don’t use a lot of common responses since I use TextExpander, but some things you might want to set up so that Pixifi can auto populate emails for you, adding names, invoice amounts, contract passwords and more! The nice thing is that there is a wizard that gives you a starting point. Since I don’t really use these as much as most people do, here’s a few screenshots of the wizard process:
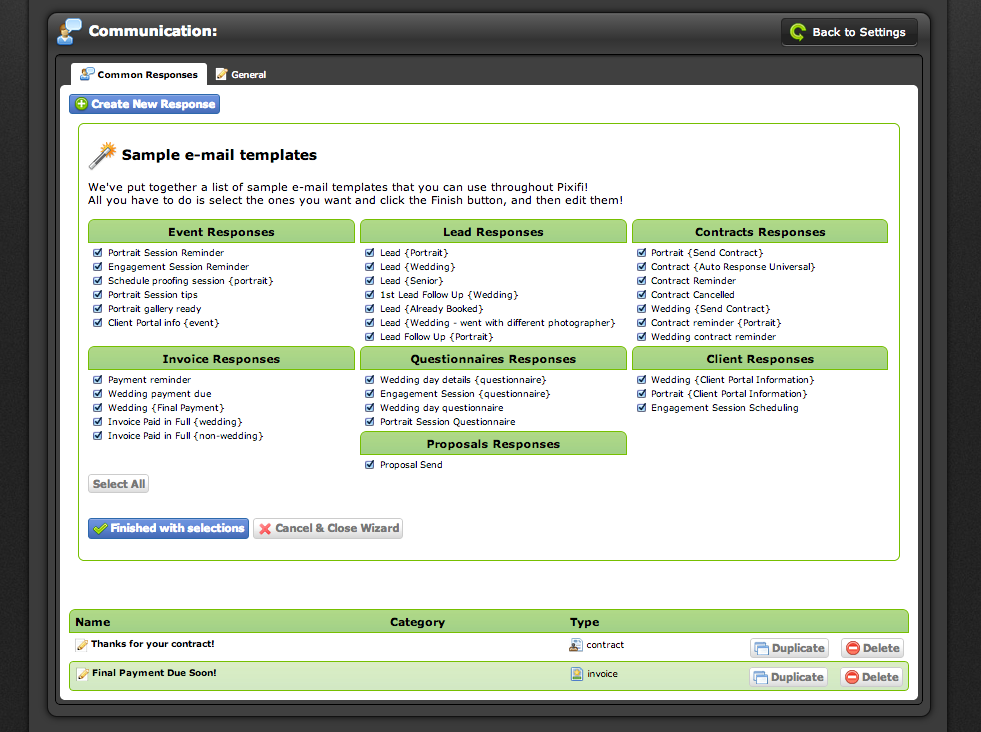
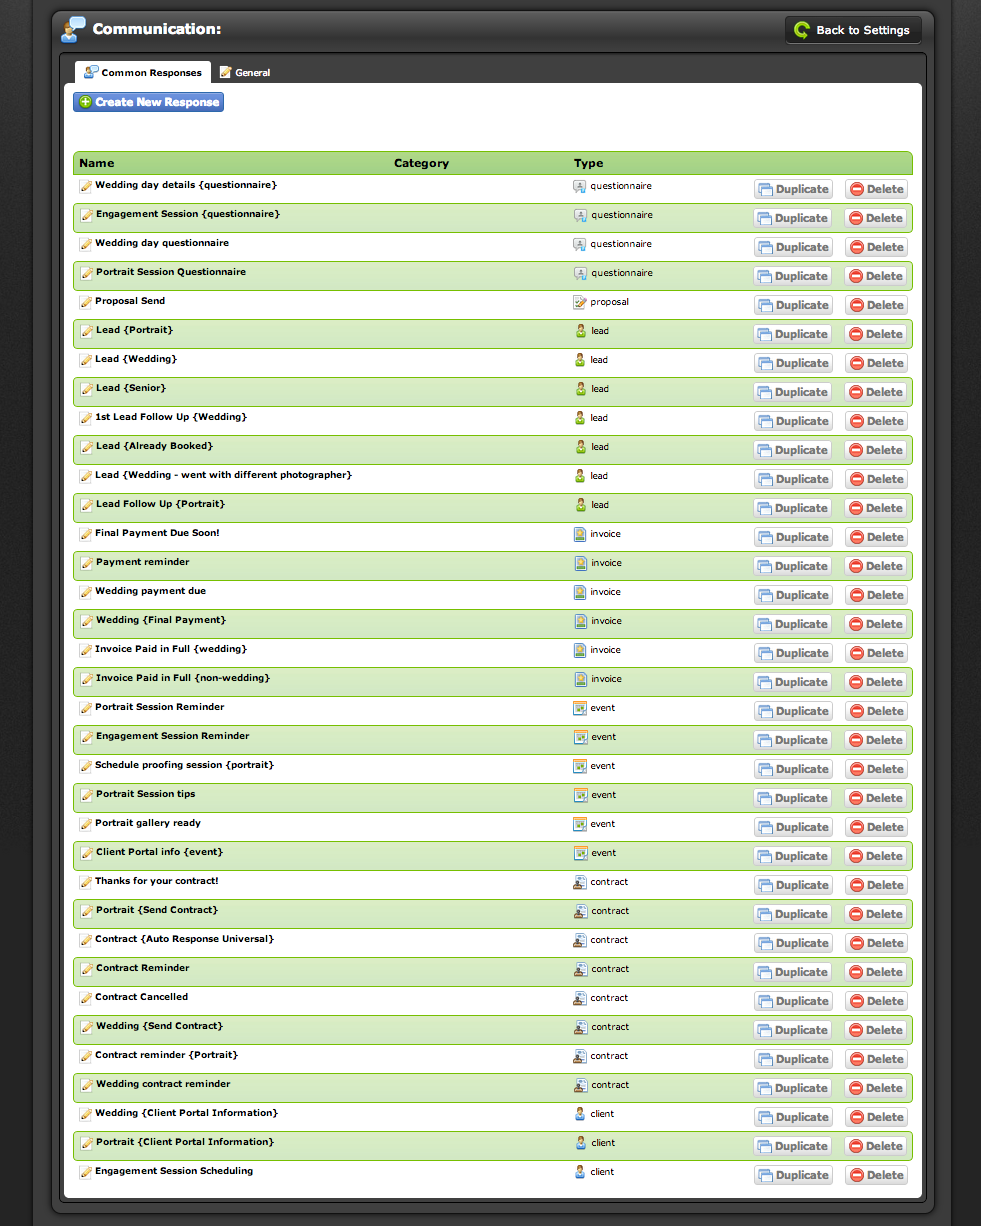
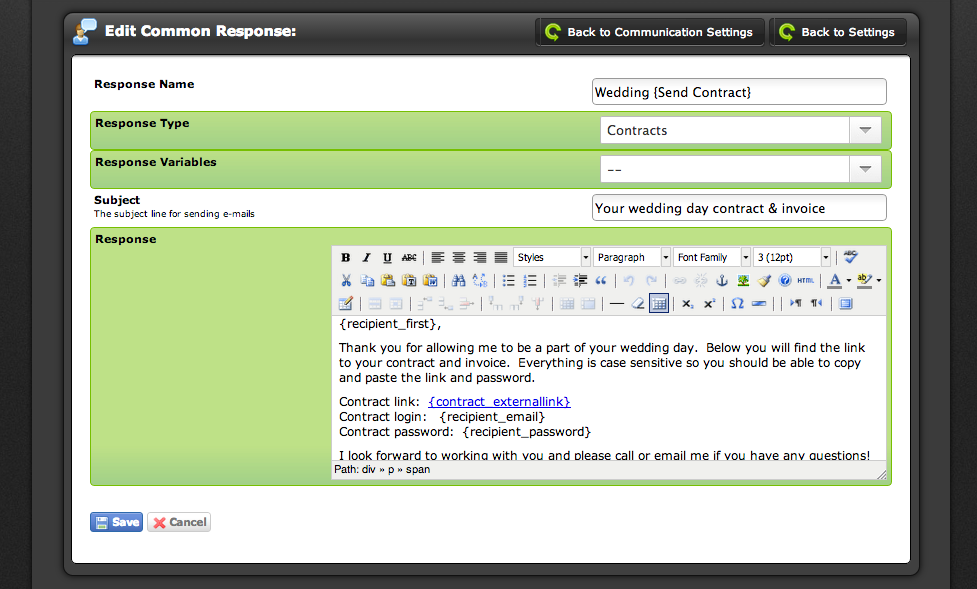 One of the emails the wizard creates is in the third screenshot in this section. Anytime you see something surrounded with { }, Pixifi will automatically populate it with information you’ve already entered for the client. All of your automatic populations are under “response variables.” Again, if you aren’t using TextExpander, you definitely should be using common responses, at least to help you save a little time day-to-day, because it truly does add up over a span of time!
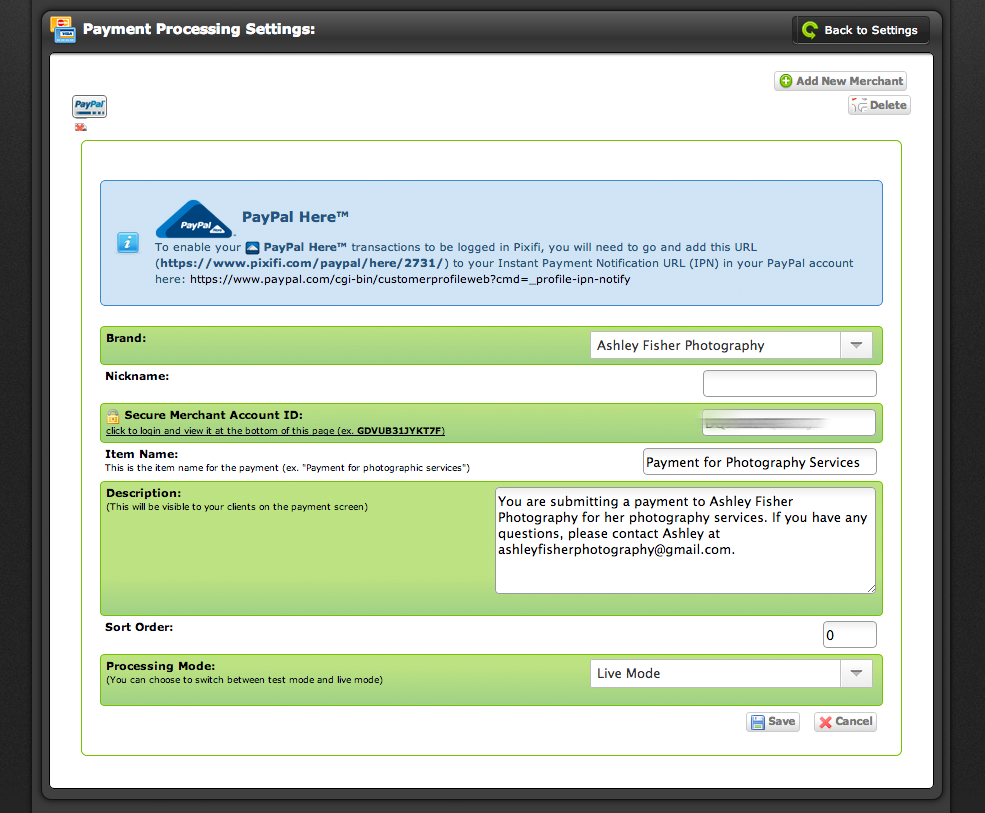
4. Online Payment Processing
GET THERE: https://www.pixifi.com/admin/settings/paymentprocessing/ (or settings > merchant)
Part of the reason I switched from ShootQ to Pixifi was so that I could require BOTH a signed contract AND the retainer to finalize the booking without having to wait on checks. Yes, I am charged a fee to use PayPal to accept payments. No, I don’t pass it on to clients. Yes, it does suck, but it’s a business expense and you can include it in your tax preparation at the end of the year. It’s worth it to me to have convenient payment options for my clients. After all, I’m all about serving my clients! Now these are just instructions for PayPal. I don’t use other payment processors, so I can’t help with those, but I’m sure if you ask in the Facebook Group, you’ll get an answer quickly!
When you click Add New Merchant in the top right corner, you’ll be able to select which merchant you want to use. There are several different options, although if it’s not listed, it probably isn’t supported. I can’t think of any that aren’t supported, but just in case you are wondering, I figured I’d throw that out there. You need to get your merchant ID through PayPal’s website. There are instructions for doing so within the wizard. Once you click Save, you’ll be set up for payments! You need to do this before sending any contracts/invoices. 🙂
BASIC SETUP | LEADS, EVENTS, AND CLIENTS
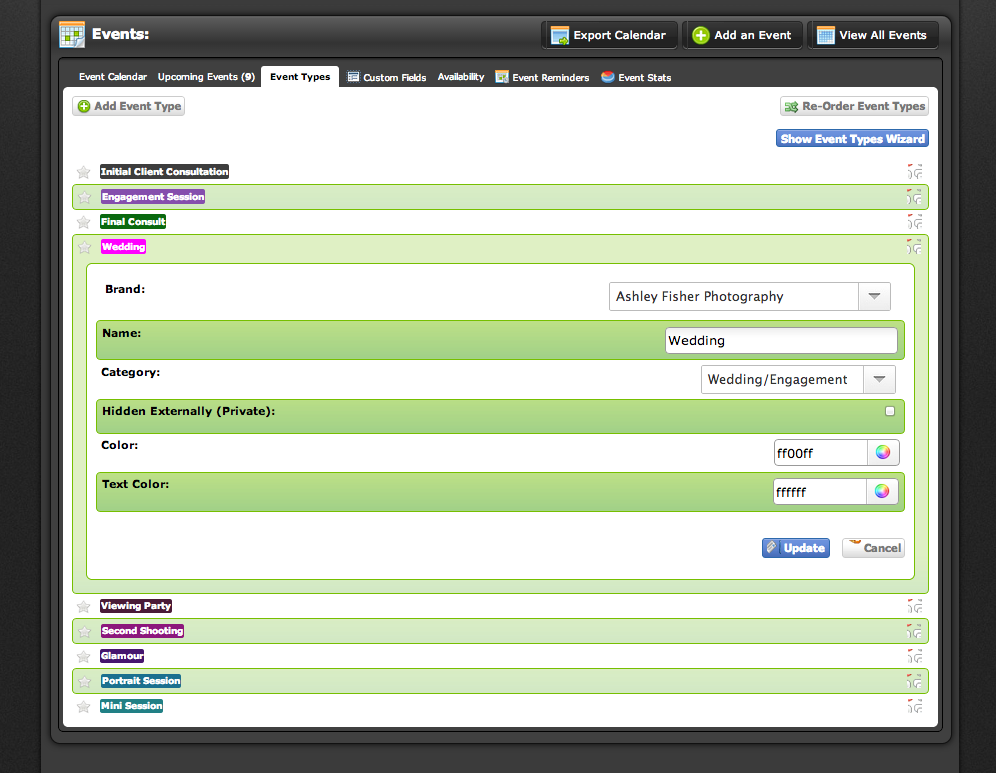
5. Event Types
GET THERE: https://www.pixifi.com/admin/events/ (or things to do > events > event types)
Since you have the ability to search in pixifi, you have the ability to track stats in pixifi, you have the ability to see your events on your pixif calendar AND your synced Google Calendar, and because you want to attach everything to an event so that it all works properly, you need to go in and set up your event types. There is also a wizard that will auto populate the most common event types, or you can just add the ones you use yourself. I have mine pretty limited since most of my work is in just a few categories. You can also change the colors and categorize your event types.
The remainder of the events module:
- Event Calendar – you can sync your event calendar to your google calendar. It’ll show up both in your event calendar and in your google calendar! 🙂
- Upcoming Events – this is just your upcoming events in list form rather than in calendar form. Greyed out events have already occurred, black events are upcoming. There are also option icons for each event in this mode: archive event, print event, event pictures, event invoices, create an invoice, delete the event, export to outlook/ical
- Custom Fields – I don’t use this as I don’t use the proposal module or the pixifi inquiry form.
- Availability – I don’t use this as I don’t use the proposal module or the pixifi inquiry form.
- Event Reminders – here you can schedule emails (they MUST be common responses) to be sent to your clients for their consults/sessions (i.e., EVENTS that you have created). The emails can be anything that you can send a certain number of days/weeks/months before or after an event (e.g., reminders, thank you, scheduling a viewing party, happy anniversary, etc.). To schedule an event reminder, click Add New Reminder Template, add a name, and click save. To add the reminder, click on the name of the template, and then click on add reminder. Select the common response (so if you don’t have one, you’ll have to go back to the common responses step and add one before you can continue (be sure to refresh…see why we’re doing it in this order now?). Once you have your common response written and selected, you’re going to schedule your reminder to automatically send. You write in a number, select days/weeks/months, and then before or after the event. Click save!
- Event Stats – here you’re able to see in chart + pie graph form the number of events you’ve had over the past year and by type. It’s pretty cool to see where the majority of your work is coming from!
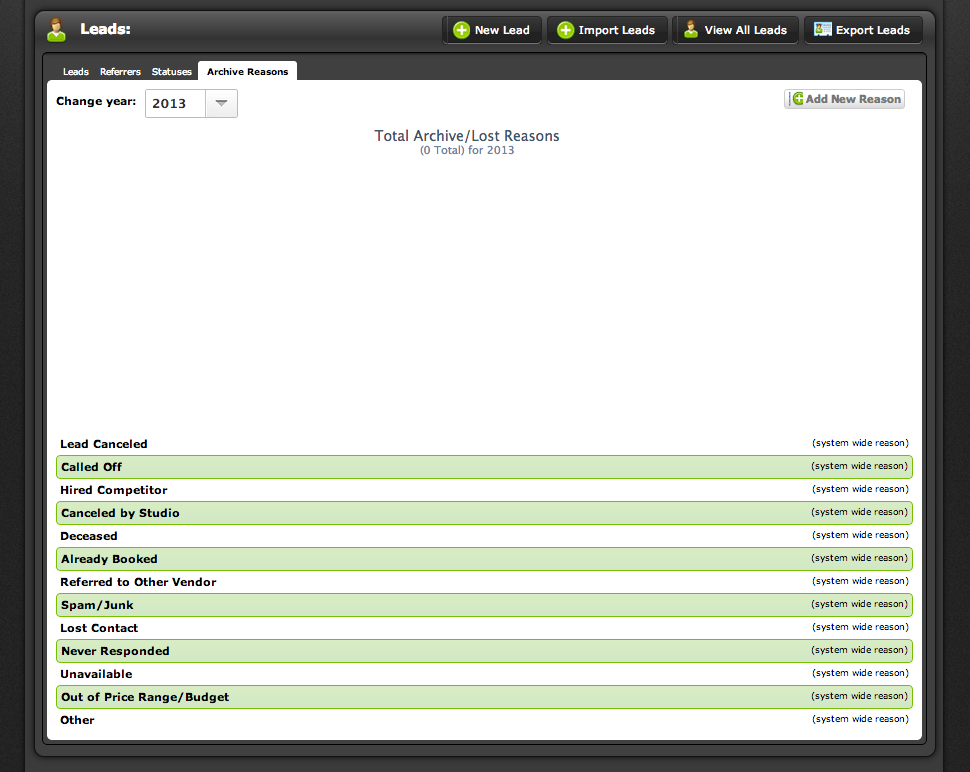
6. Lead Types + Archiving Leads
GET THERE: https://www.pixifi.com/admin/leads/ (or contacts > leads > lead statuses)
Until very recently, I wasn’t using leads. When I would get an inquiry, no matter what, I’d add them as a client. If they booked, great. If they didn’t, I was just archiving them. I had no way of tracking my leads, sorting them if I wanted to send any sort of communication, or keeping track of reasons why they declined to book. So as of a few days ago, I’m using leads! Under the lead statuses, you’re able to create different statuses to track your leads. I have six lead statuses, but you can create as many or as little as you’d like:
Non-Bridal Show Potential Clients (Weddings/Glamour/Portraits):
- Stage 1 – Initial inquiry has been received. Potential clients remain at this status until they respond to the initial email I send after receiving their inquiry.
- Stage 2 – Leads are bumped to this status when they respond to the initial email I sent them after receiving their inquiry.
- Stage 3 – Leads are bumped to this status when an in person or skype consult is scheduled. They remain at this status until they indicate that they are ready to book and converted to a client OR are archived because they have declined to book with us.
Bridal Show Potential Clients:
- Potential Lead – couple has no date and no venue
- Solid Lead – couple has a date but no venue
- Strong Lead – couple has a date and a venue
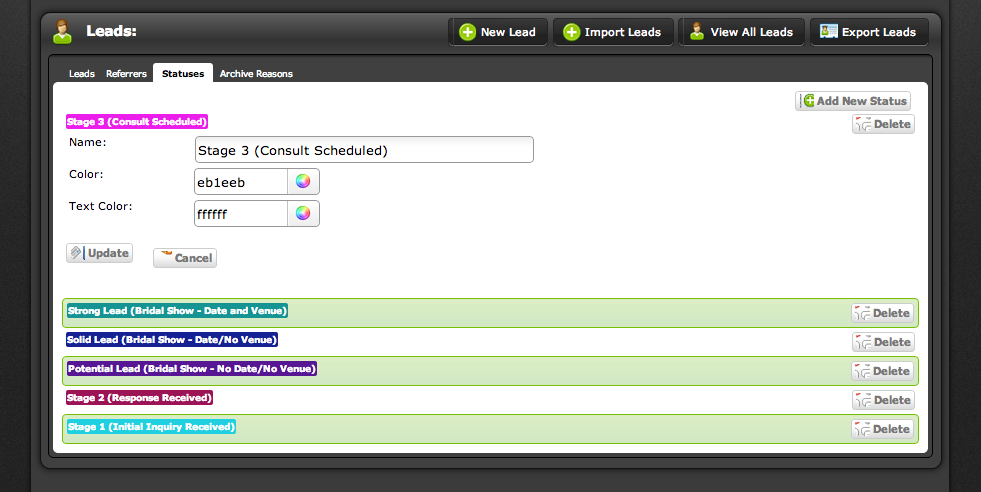
If a lead ultimately doesn’t pan out, you can archive the lead and attach a reason for archival. You can add additional reasons for archival, but these reasons are already included:
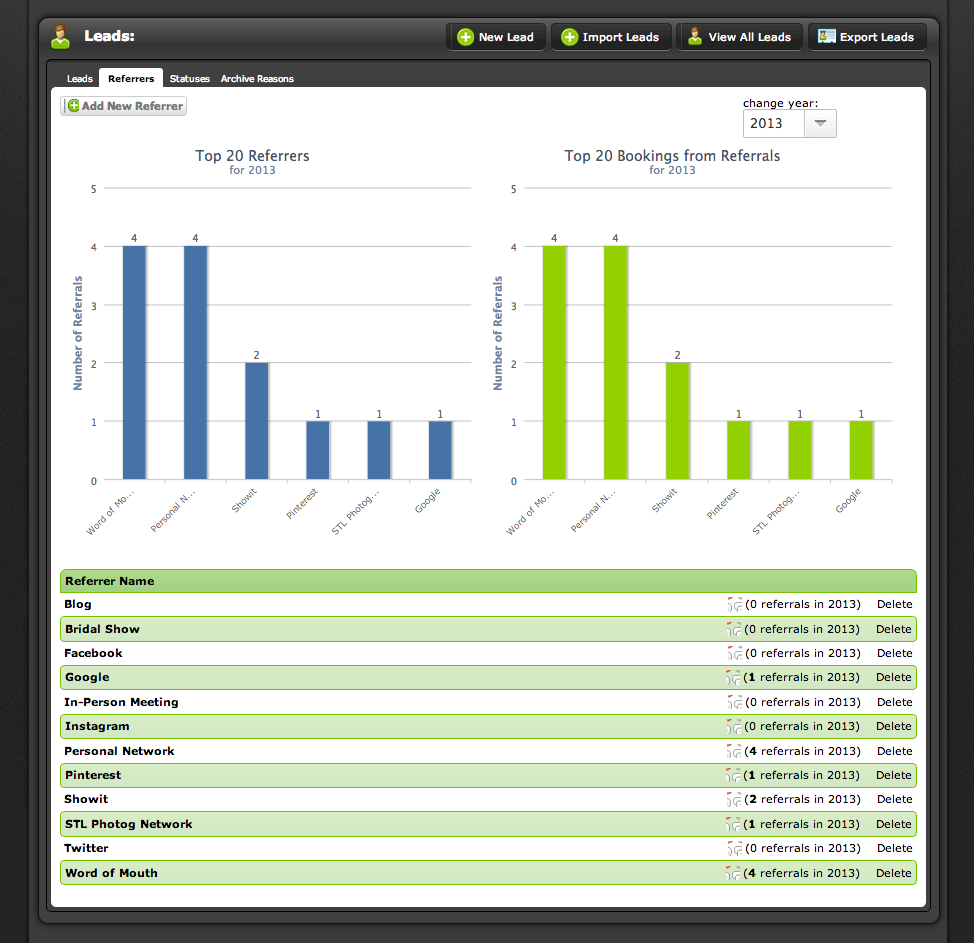
7. Referrers
GET THERE: https://www.pixifi.com/admin/leads/ (or contacts > leads > referrers)
Truthfully, I haven’t been using pixifi to its full potential. I wasn’t adding referral sources to all of my clients (and if I was, I was adding specific names instead of groups), so I wasn’t able to track where my referrals were coming from. So over the past few days, I started adding my referral sources + made sure to group them so that I could see where efforts are working or aren’t working. For some of my referral groups (word of mouth, personal network, showit, and STL photog network), I have added specific names in the client notes. Now, just to finish adding the rest! 🙂
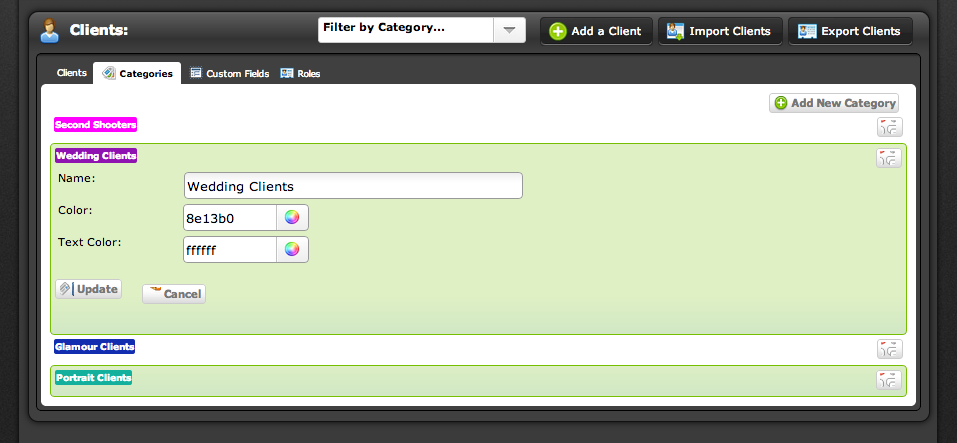
8. Client Categories
GET THERE: https://www.pixifi.com/admin/clients/ (or contacts > clients > categories)
You’re able to categorize your clients however you wish. I don’t rely on this as much, so I only have four categories – weddings, glamour, portraits, and second shooters. The reason I include second shooters is because the only way I can have my seconds sign my second shooter contract is to add them as a “client” in pixifi. So this way I can at least track who is a second shooter and who is an actual client.
The remainder of the clients module:
- clients – this is my most used part of pixifi. It has a list view of all of my clients. I can click on their name, access their event, send them invoices, contracts, questionnaires, etc.
- custom fields – I don’t use this as I don’t use the proposal module or the pixifi inquiry form.
- roles – this is where you can set up the most commonly used roles of important contacts. It has a LOT of roles included (bride, groom, mother of bride, planner, brother, etc.), but of course you can add others
BASIC SETUP | TEMPLATES FOR CONTRACTS, QUESTIONNAIRES, & WORKFLOW
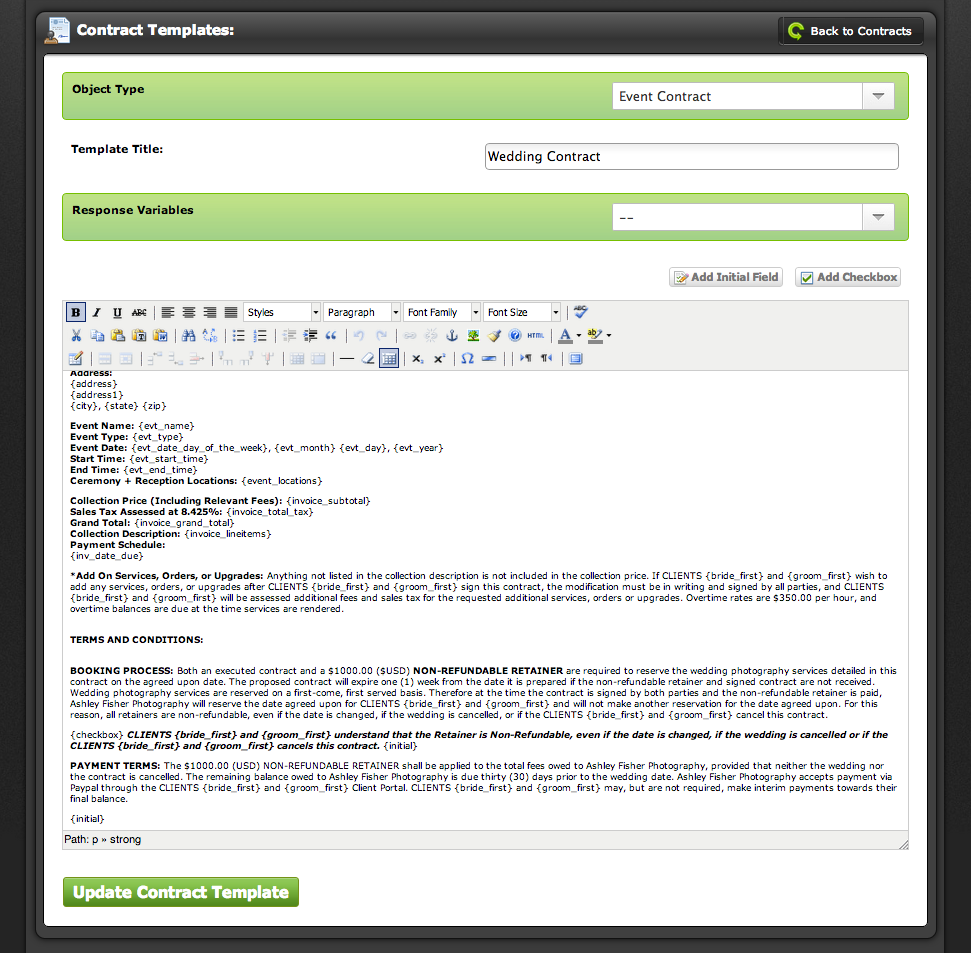
9. Contract Templates
GET THERE: https://www.pixifi.com/admin/contracts/#templatesDIV (or templates > contracts)
This is hands down one of the best features of any studio management software, but I particularly love Pixifi’s contract template abilities. I have five contracts: wedding, glamour, portrait, second shooter (paid), and second shooter (unpaid). You’ll want to make sure you select the proper object type. You’re mostly going to use event contracts. I only use project contracts for my second shooters. Choose a template title that is easy to identify.
You should write your contract in evernote or word or google drive. I didn’t and accidentally hit the back button and lost the entire contract. That wasn’t very much fun! Write it and then paste it in, and then you can add formatting and add in response variables, initial fields, and checkboxes. Anything that is in between { } will be auto populated by pixifi, and you can find them in the response variables drop down. Sometimes it doesn’t populate what I expect it to for the event info + package info, so I double check before I send the contract to a client and sometimes have to manually enter it. I add an initial field after every clause of the contract, which populates when the contract is sent. I do this because I don’t want clients to come back and say they didn’t know something was in the contract. I also really like the add checkbox feature, which also populates when the contract is sent. I have only used the checkbox feature when adding a privacy clause to a glamour contract so that they can choose where I can share images.
10. Questionnaire Templates
GET THERE: https://www.pixifi.com/admin/questionnaires/ (or templates > questionnaires)
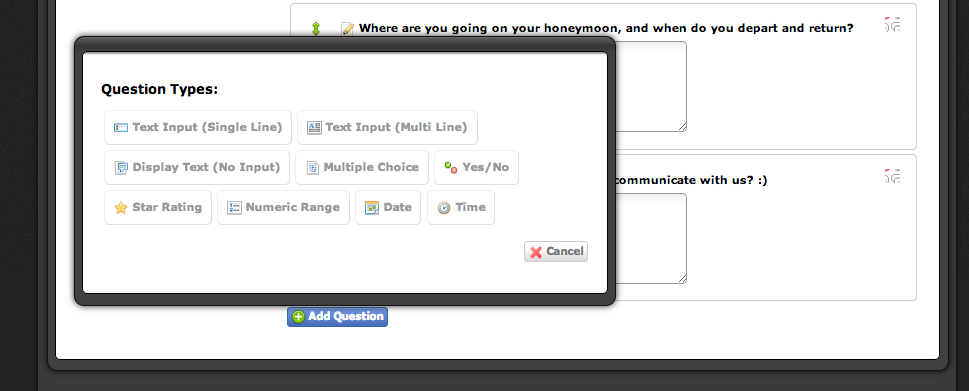
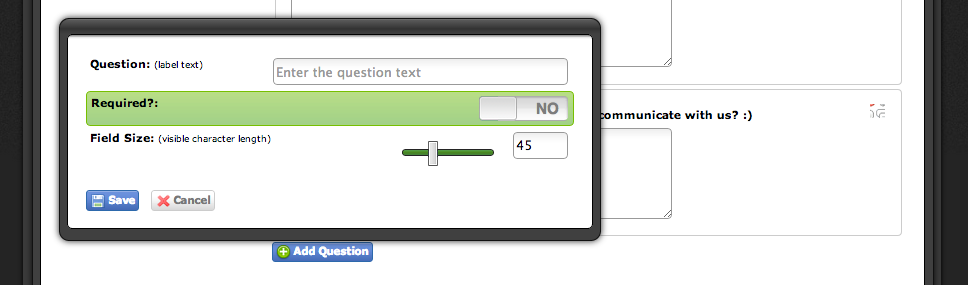
The ability to send clients questionnaires is another awesome feature of Pixifi. You can send getting to know you questionnaires, wedding day questionnaires, satisfaction questionnaires, etc. You have the ability to ask different types of questions, too: single line questions, multi line questions, multiple choice questions, yes/no questions, star rating questions, numeric range questions, and date/time questions. You can make them required or non-required, as well. When you click on “add question,” the question box will appear at the BOTTOM of the questionnaire template. Make sure you click save when finishing a question! You can move questions and up and down one by one by clicking on the little green arrow (so it would be advised that you plan out your questionnaire before typing it into pixifi and start from the top! You can edit existing questions by clicking on the pencil.

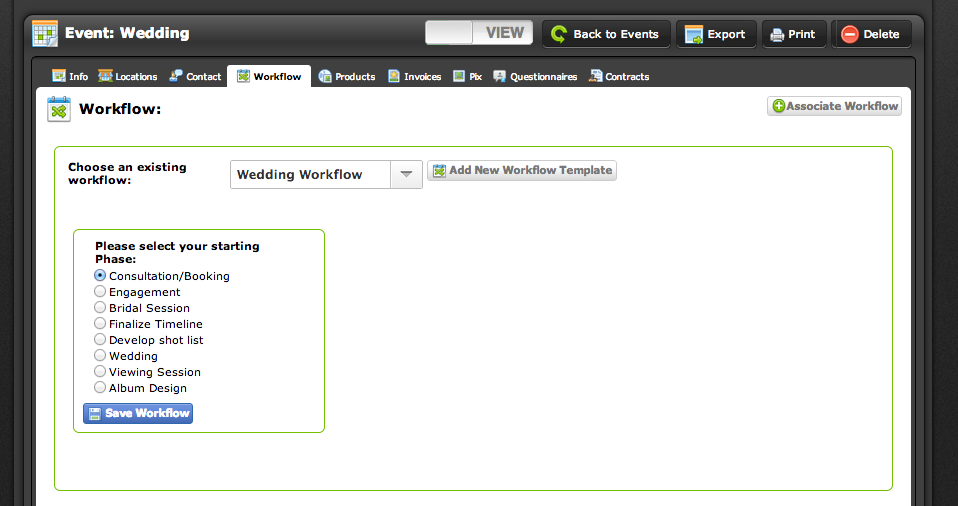
11. Workflow Templates
GET THERE: https://www.pixifi.com/admin/workflow/ (or templates > workflow)
A lot of us are still using post it notes and dry erase boards, but Pixifi allows me to assign a workflow to a client, notifies me of my tasks, and allows me to check off workflow tasks as I complete them. This ensures that all of my clients have the same experience and keeps me on task! It’s a pretty fabulous and cheap assistant! Again, choose a simple name for your template name, and most template types will be event. I don’t use project for any of my workflows. You can re-order phases and tasks by using the green arrow, and you can edit tasks and phases by clicking the pencil in front of tasks or clicking on the bolded phase. You can also add emails (common responses) to be sent once a phase is completed, but I don’t use that option.
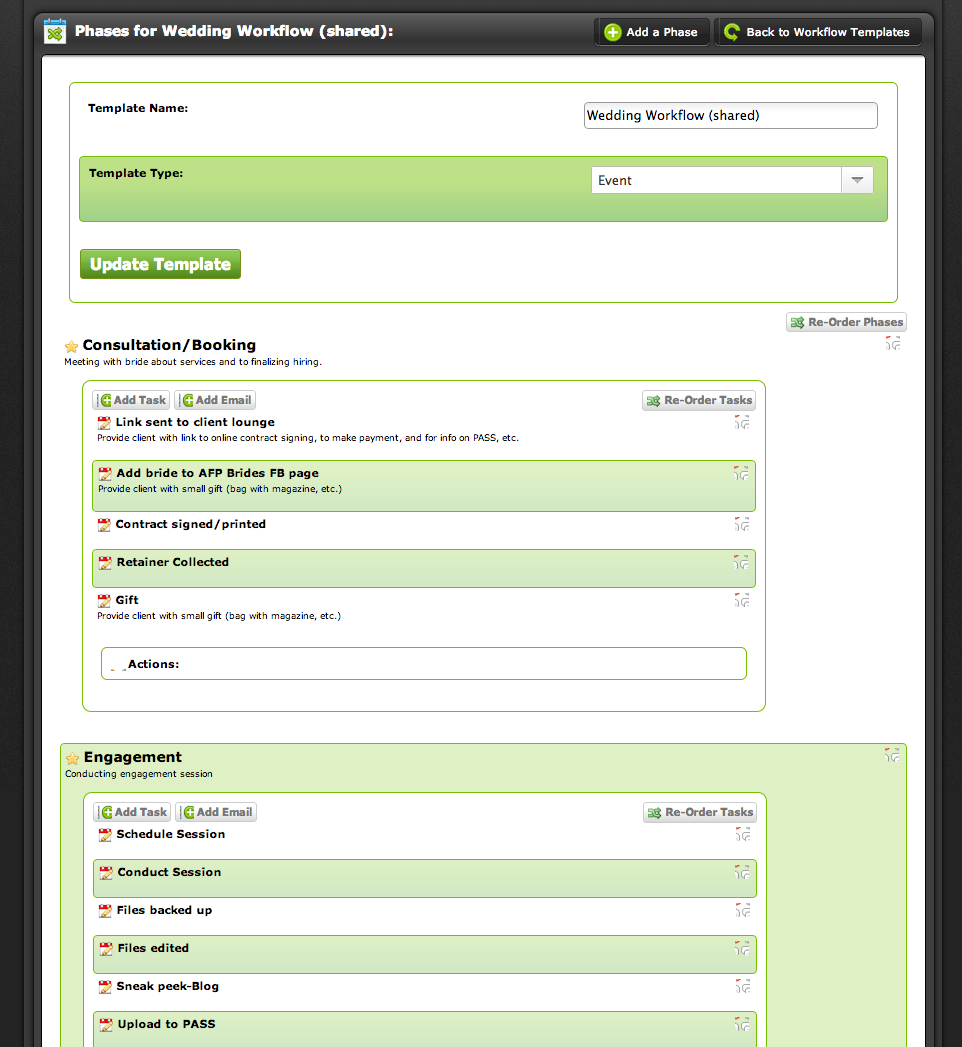
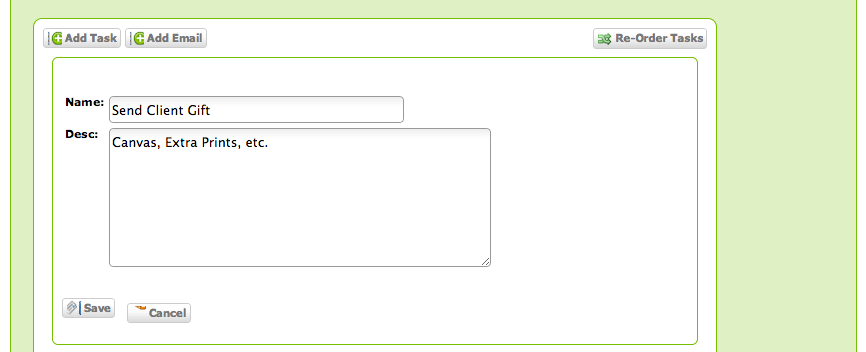
If you want to be able to assign a due date, you have to make the item a phase, not a task. You do NOT have to assign a due date, though. My phases are consultation/booking, engagement session, pre-wedding, post-wedding, viewing session, and album design. Then I have different tasks within each phase. To add a phase, click “add a phase” up in the top right.
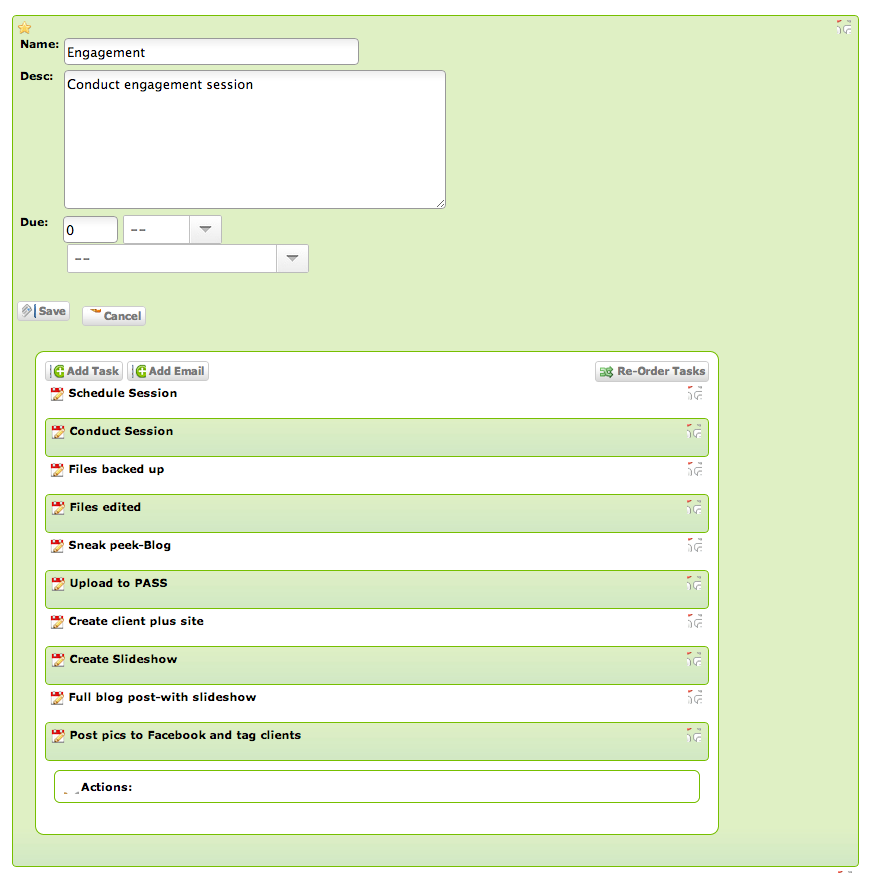
To add a task to a phase, click add task underneath the phase. You can add a description if you need more detailed information, but you don’t need to.
BASIC SETUP | INVOICES + FINANCES
12. Payment Terms
GET THERE: https://www.pixifi.com/admin/invoices/#termsTab (or finances > invoices > payment terms)
In Pixifi, you’re able to set payment terms to automatically calculate your payments on your invoices. I’m not a math person, so this is SUPER helpful for me! And remember, there’s a reason why we set everything to relate to events…if you don’t, your invoices will be all sorts of messed up (in addition to many other things not working correctly). 🙂
To add a payment term, click “add payment term” up in the top right corner. Payment terms are what will be applied on your invoice. So for a wedding invoice, my wedding payments payment term will be applied.
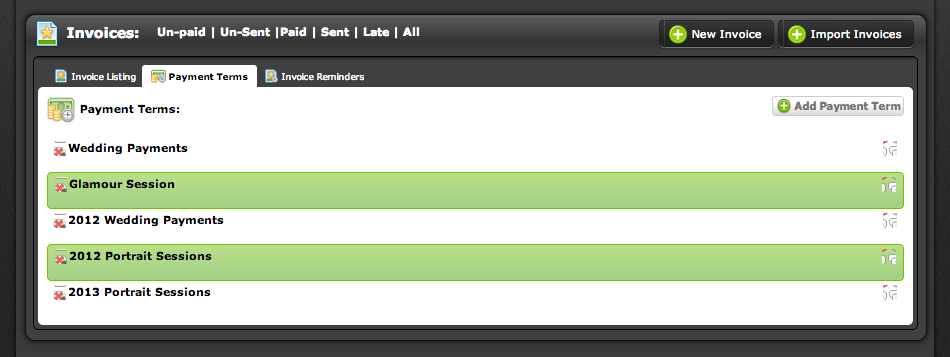
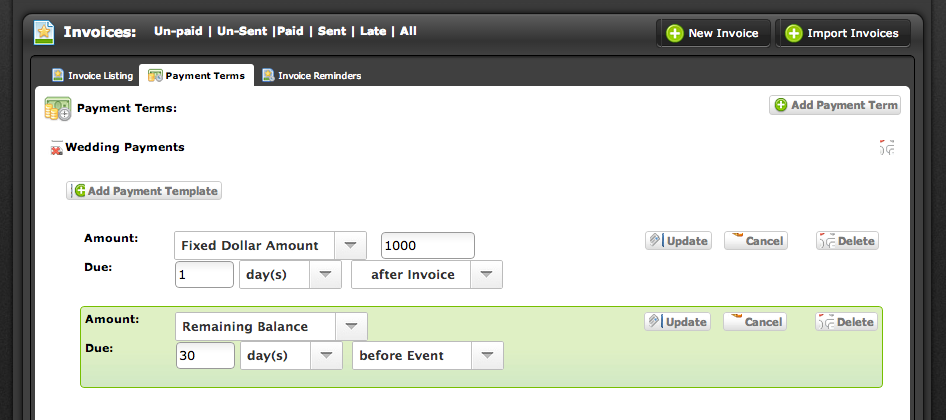
Within the payment term, I’ll add TWO “payment templates”: one for the retainer and one for the remaining balance. One thing I’ve noticed that people get confused on is that they’ll try to add two payment TERMS to an invoice instead of two payment TEMPLATES within a term. Only one payment term can be applied to an invoice! So to add a payment template, you have to click on your bolded payment term and then click on “add payment template.” If you want to have a retainer term and a remainder term, you’ll have to do two separate payment templates within your payment term. For my retainer, I do a fixed dollar amount of $1000 due 1 day after the invoice is sent. For my remaining balance, I have it due 30 days before the event. Make sure to click update to save! You do have options to require fixed dollar amounts, percentage of total, percentage of remaining balance, or remaining balance.
remainder of invoice module:
- invoice listing – here you’re able to see a visual listing of all of your outstanding invoices with due dates, payments expected, and a “thermometer” of how much has been paid v. how much is owed. It’s pretty great!
- invoice reminders – if you’ve set up common responses, you can add a reminder template to remind clients that they have a final payment coming due or are late on a payment. This is particularly nice if you hate talking finances with your clients!
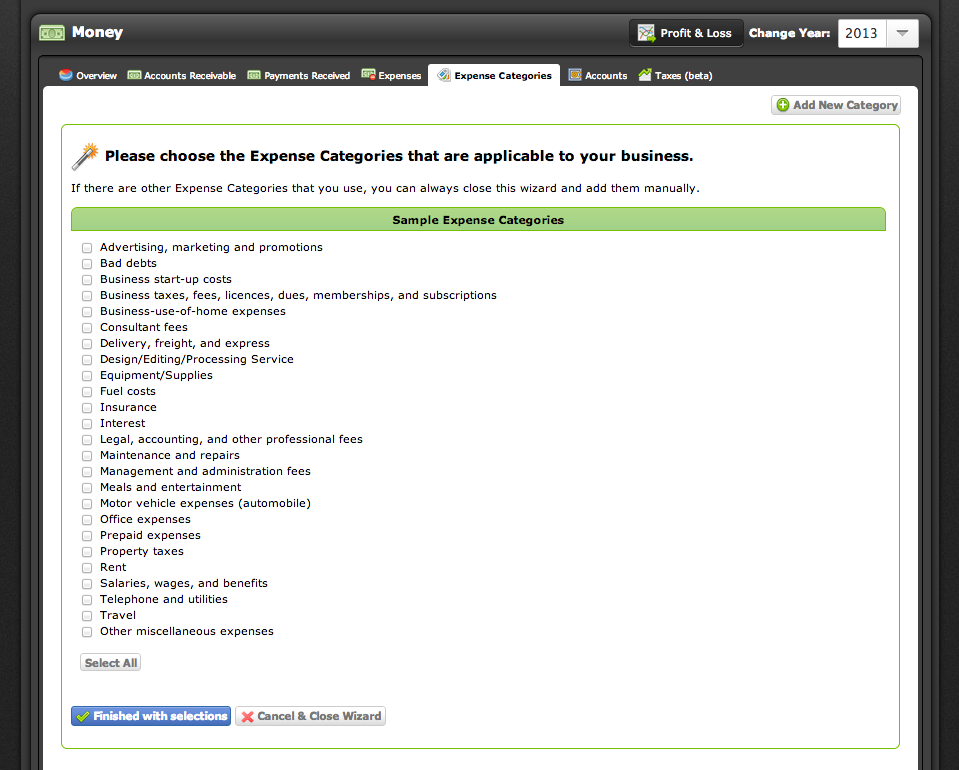
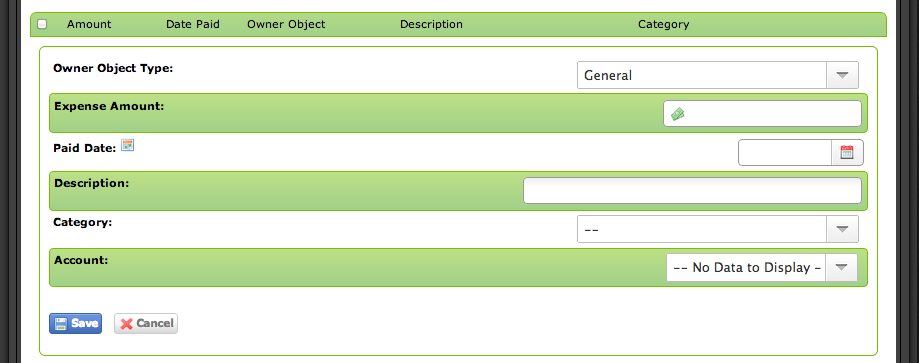
13. Expense Categories
GET THERE: https://www.pixifi.com/admin/money/#expenseCategoriesTab (or finances > money > expense categories)
When it comes to tax time, I pretty much search the house for all possible receipts over the past year, search my email and accounts for any business related expenses, and hand write everything all at once. It sucks. Well…it used to suck. This year, I have pixifi to keep track of my business finances. I haven’t delved into this section yet, so I’m walking through this part with you. In this category, there’s a handy wizard again. You can add some/all of these categories and add categories of your own.
If you then click on the expenses tab, you can add an expense item (so that your tax guy doesn’t hate you come tax time)! I haven’t changed the owner object type from General. Enter the expense amount, the date you paid it, a description of the expense, the category, and then you can also assign an account that it came from (bank account, paypal, credit card, etc.). You can set up those accounts by clicking the accounts tab in this same category.
The remainder of the money module:
- overview – here you can see payments received/due in a chart for 2013, upcoming payments in a calendar, total income in 2013, total income received in the current month, total invoices in the business, total expenses for the year, total spent in the current month, and total expected but not yet paid for the current year. it’s a great financial snapshot of your business (if you’re keeping up with it!)
- accounts receivable – a list of all of the invoices/expected income that hasn’t yet been paid for the current year
- payments received – a list of all of the invoices/payments received in the current year, as well as the fees paid (yay for not having to search through your statements!)
- taxes – sales tax made easy! it shows a list of invoices with total received, total taxable, and the tax amount
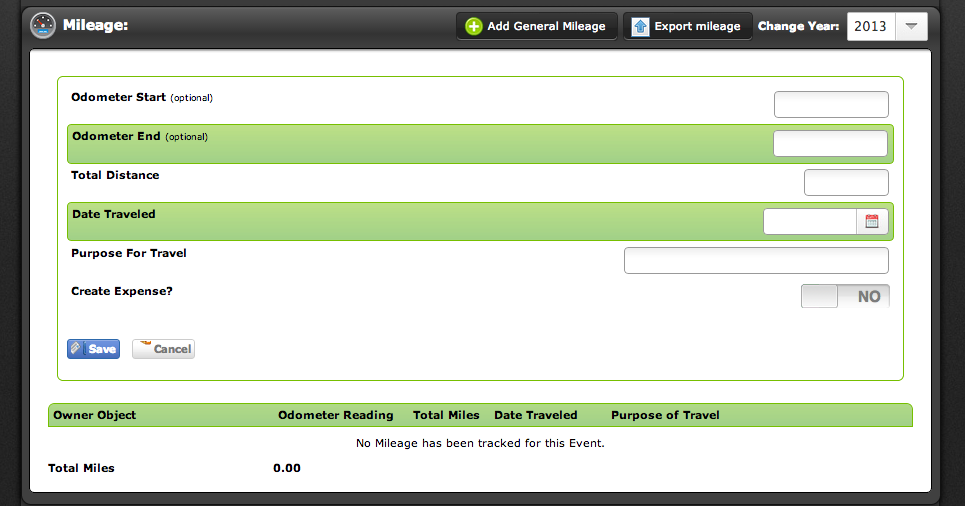
14. Mileage
GET THERE: https://www.pixifi.com/admin/mileage/ (or finances > mileage)
Another thing I despise doing during tax time is calculating my mileage because no matter how much I want to stay on top of it…I just lose it at some point in the year. Pixifi recently released a mileage module, which has been a LIFE SAVER. All you have to do is put in the total distance, date traveled, purpose of travel and click save! You can also add the odometer start/end if you’d like, and you can also create an expense automatically if you want. It’s pretty much amazing. 🙂
BASIC SETUP | PACKAGES + PRODUCTS
15. Packages
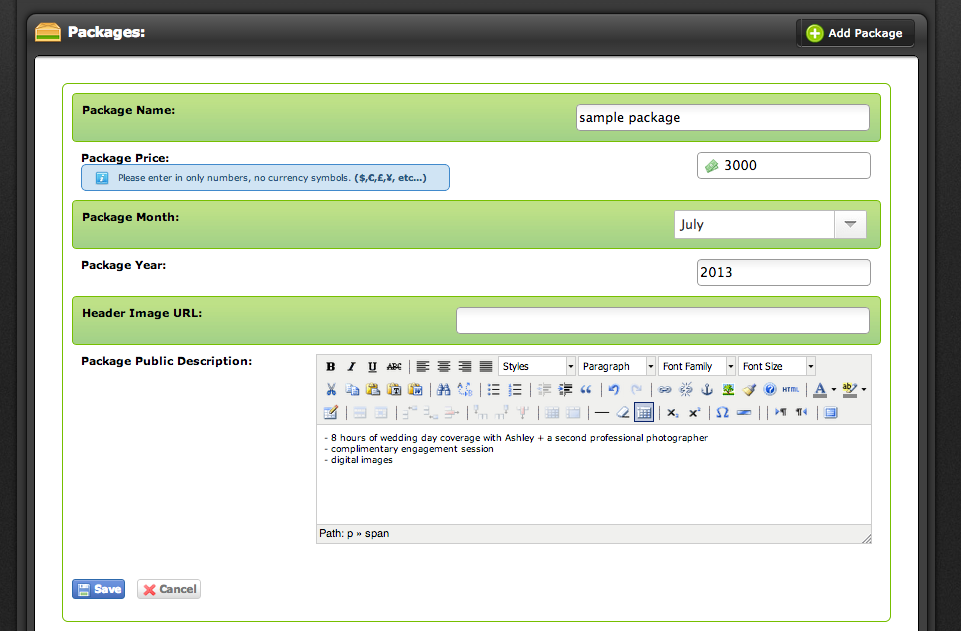
GET THERE: https://www.pixifi.com/admin/packages/ (or templates > packages)
Before you send your first contract and invoice, make sure you set up your packages! To add a new package, click “add package” in the top right corner. Name your package so that it’s easy to find when creating your invoice. Then insert your package price without any sort of currency symbols. For package month and year, I put the first month the pricing goes into effect. I never edit the packages if I change them up…just add a new one! Then you can track where you’ve been over time. I don’t use the header image URL. In the package public description, I put everything that the package includes as line items. Here’s a sample package:
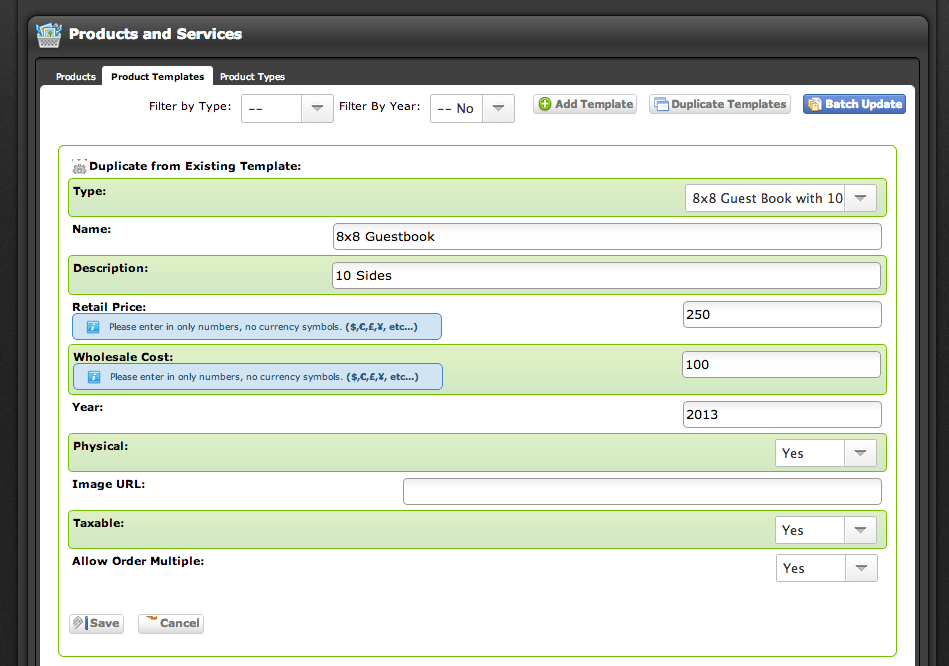
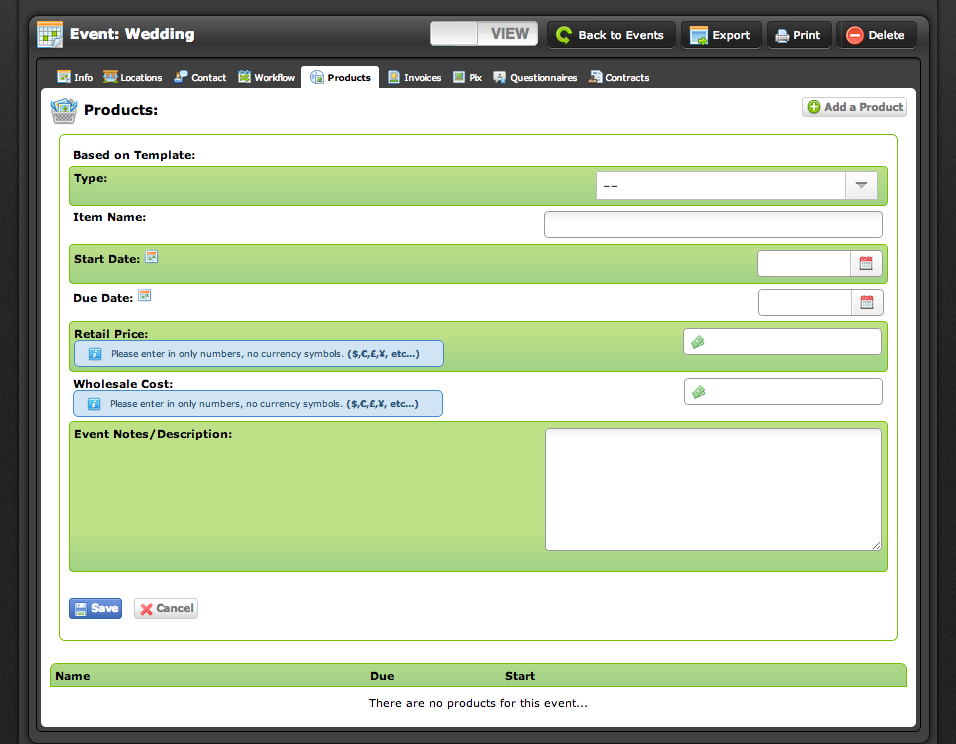
16. Product Types + Templates
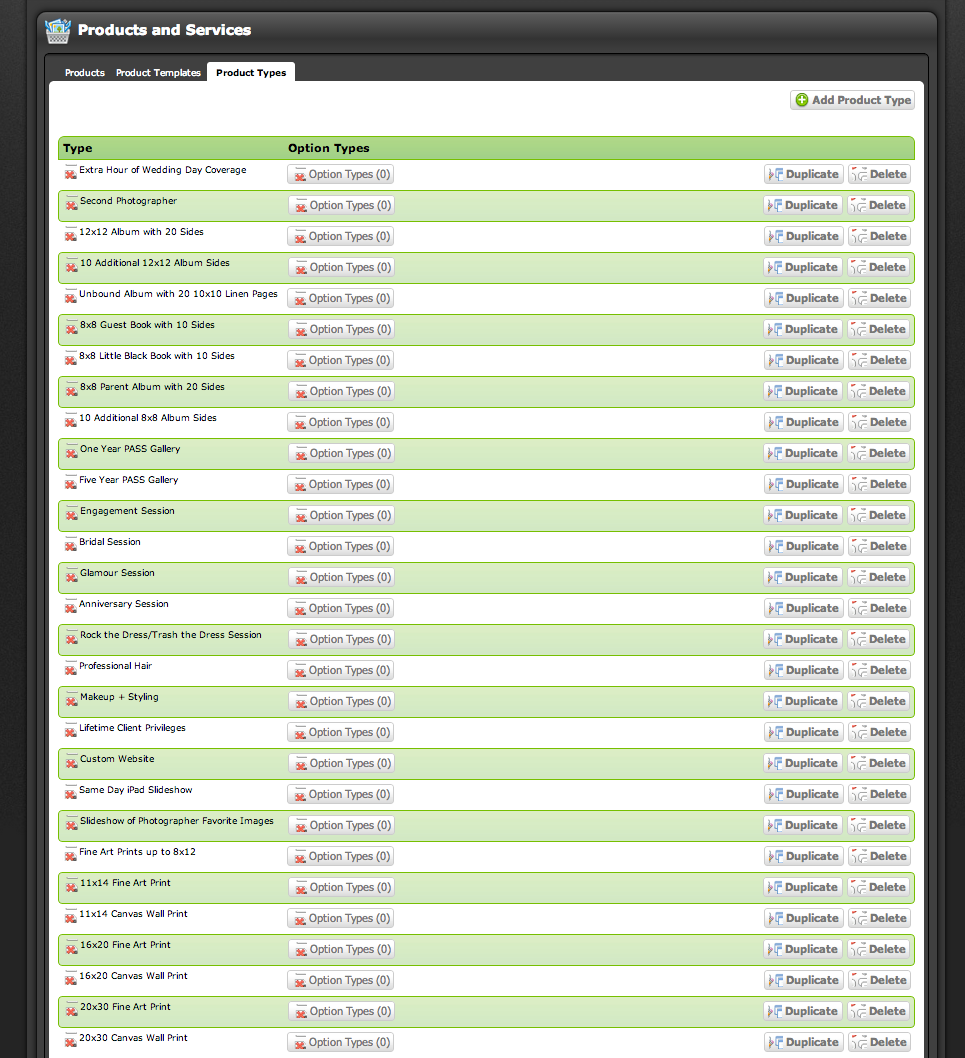
GET THERE: https://www.pixifi.com/admin/products/ (or templates > products)
If you’re in a state like MO where digital images are not taxable but physical products are, you’ll definitely want to make sure you set up your product types and templates so that you can add them as line items so that sales tax is applied appropriately. First, you’ll need to set up your product types. All you need to do is click “add product type” in the upper right corner, add a name, and select whether the product type is a physical item or a service.

Once you’ve added all of your different products + services, switch over to the product template tab. Click “add template” up top. Here’s a sample screenshot below (and no those aren’t real numbers). 🙂
- type – choose the product type from the drop down
- name + description – I tend to use the same name as I did for the product type
- retail price – how much you charge the client (no currency symbols)
- wholesale cost – how much your supplier charges you (no currency symbols)
- year – this is helpful since most labs increase costs from year to year + you need to up your own prices to compensate
- physical – is this a physical product (yes) or is this a service/digital product (no)
- image url – I don’t use this
- taxable – is it subject to sales tax (check with your state’s department of revenue)
- allow order multiple – unless there’s a reason you only want one to be sold, I would leave this set to yes
BASIC SETUP | MISCELLANEOUS
For anything that we haven’t yet covered, here’s a brief overview:
- Dashboard: once you’ve completed the basic setup and clicked finished, the dashboard holds your upcoming events, latest leads, current tasks, upcoming payments, and your calendar. If you have a busy studio, this is your lifeline!
- Vendors (under Contacts): this is basically an address book for all of your vendors. You can add various Vendor Types (DJs, videographers, florists, etc.), and then you can add specific vendors with contact information under the vendor tab.
- Projects (under Things to Do): I only use this for second shooters
- Tasks (under Things to Do): you can add new categories of tasks under the categories tab (to-do, follow-up, etc.). You can add specific tasks under the tasks tab. You can assign it to various people in your studio, add a due date, give it a title, add details, mark it off, and determine whether it shows on your dashboard.
- Workshops (under Things to Do): only available in the highest pixifi plan. I don’t use this.
- Proposals (under Things to Do): I don’t use this.
- Locations (Under Templates): use this for contact information for your favorite shooting locations/venues
- Proposal Templates (Under Templates): I don’t use this.
- Pricing Pages (Under Settings): I don’t use this.
- External (Under Settings): If you want to integrate Pixifi with your external calendars, Showit, Flickr, SmugMug, MailChimp, Mad Mimi, Dropbox, etc., go here to set up those preferences!
- Sharing (Under Settings): This is where you’ll want to go if you want to share things like contracts, questionnaires, workflows, etc. with other pixifi users
- Account (Under Settings): your current account settings/contact info
- Subscription (Under Settings): your current subscription + license info
- Staff (Under Settings): This is where you can keep track of your studio’s staff, emails, passwords, and permissions within pixifi
- Referrals (Under Settings): This is NOT where your business has come from. This is for tracking people who have signed up with Pixifi using your referral URL
- Export Data (Under Settings): under construction
- Cancel Account (Under Settings): instructions on how to cancel your pixifi account
Random Tidbits of Info:
- If you can’t figure out how to edit something, check to see if there’s a slider up top that says “View.” If there is, chances are, if you slide it, it’ll switch to edit. 🙂
- If you need to get your setup menu back, go to application under settings and switch the slider from hide to display
- Tim Hussey, the developer, is AMAZING. He’s always available in the Pixifi group on Facebook to answer questions and take suggestions for making pixifi work for you! Join the Facebook group here: https://www.facebook.com/groups/pixifi/
STEP-BY-STEP | HOW TO BOOK A CLIENT USING PIXIFI
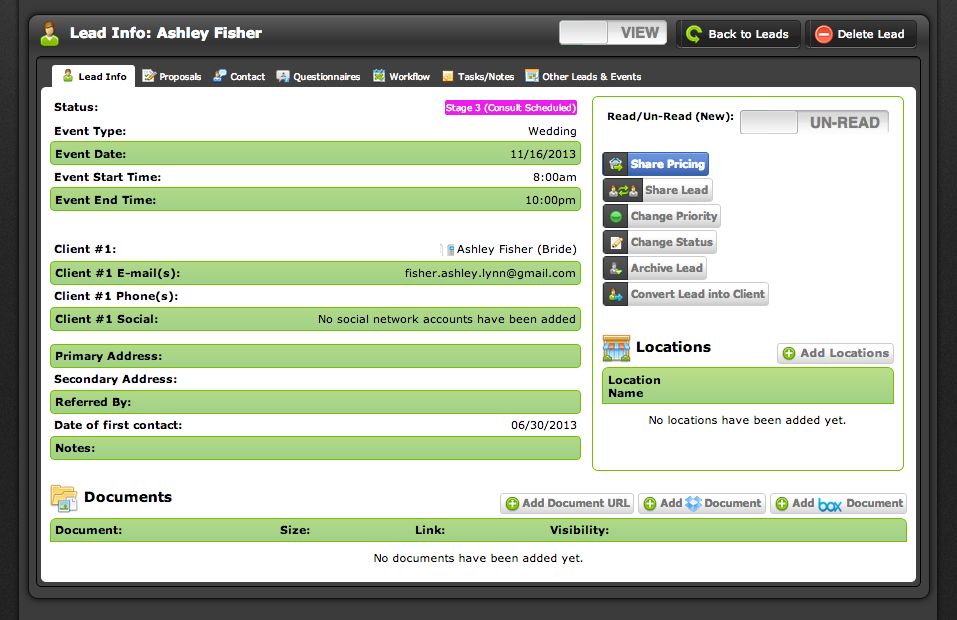
- Select your lead and click “convert lead into client” on the right side
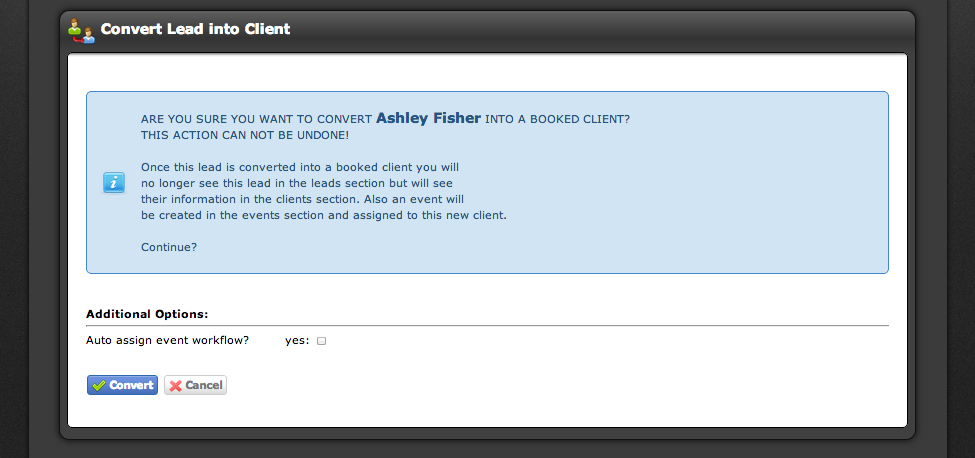
- Click “convert”
- Switch the slider up top from “view” to “edit”
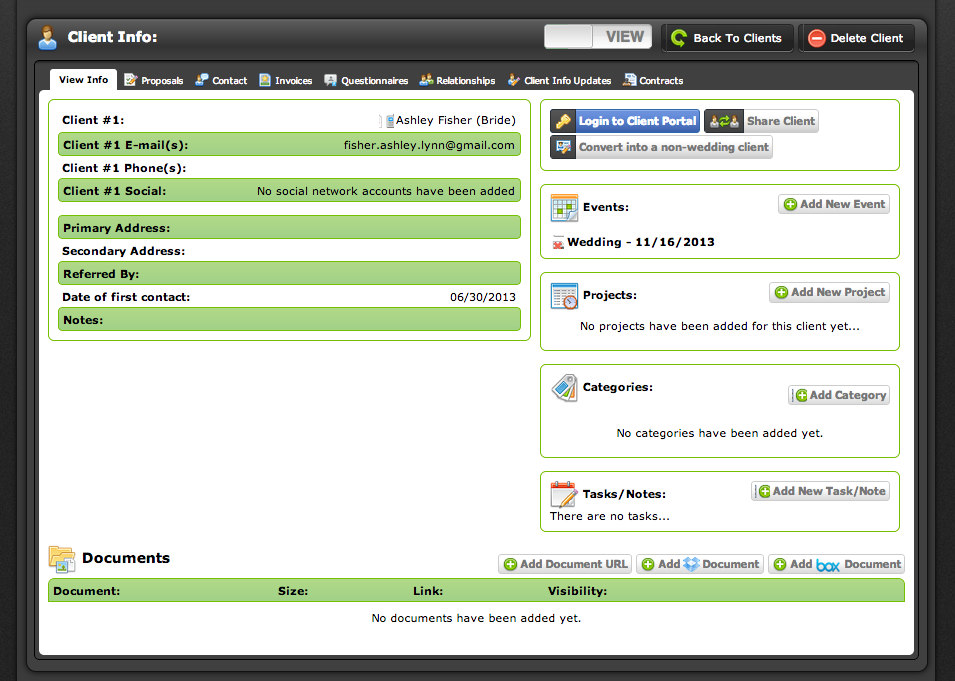
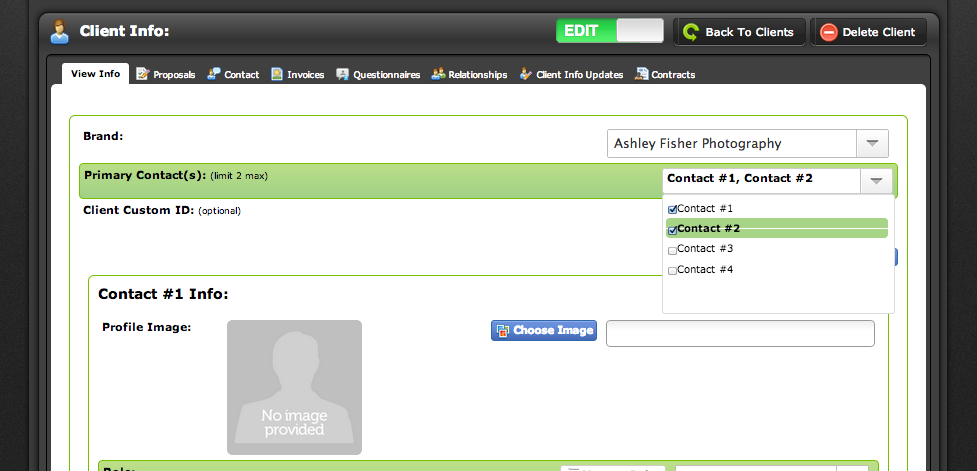
- Fill out the client’s contact information. If it’s a wedding, make sure to include contact #1 and contact #2 for primary contacts so that both bride and groom sign the contract. You can add social media info if you click on choose image under the contact info! Email is necessary. Address is not necessary, but you should include it if you have it. Down at the bottom under general contact info, you’ll want to include username and password for their client portal. I always do groomlovesbride (e.g. johnlovesashley) for their username and wedding date in MMDDYYYY as their password. You can choose the referral source (that you’ve already set up) by clicking on the associate referrer button. Make sure to click SAVE under the referral or it will not save properly. If it’s an individual, put that individual’s name in the notes section. Any notes you might have from the consult should also go in the notes section! Click update at the bottom!
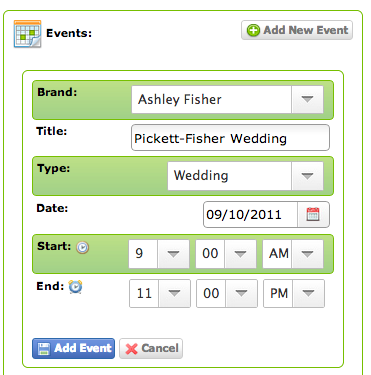
- Make sure that there is an event associated with the client (and properly filled out). Make sure you physically click on the event so that you are on the event page NOT the client page.
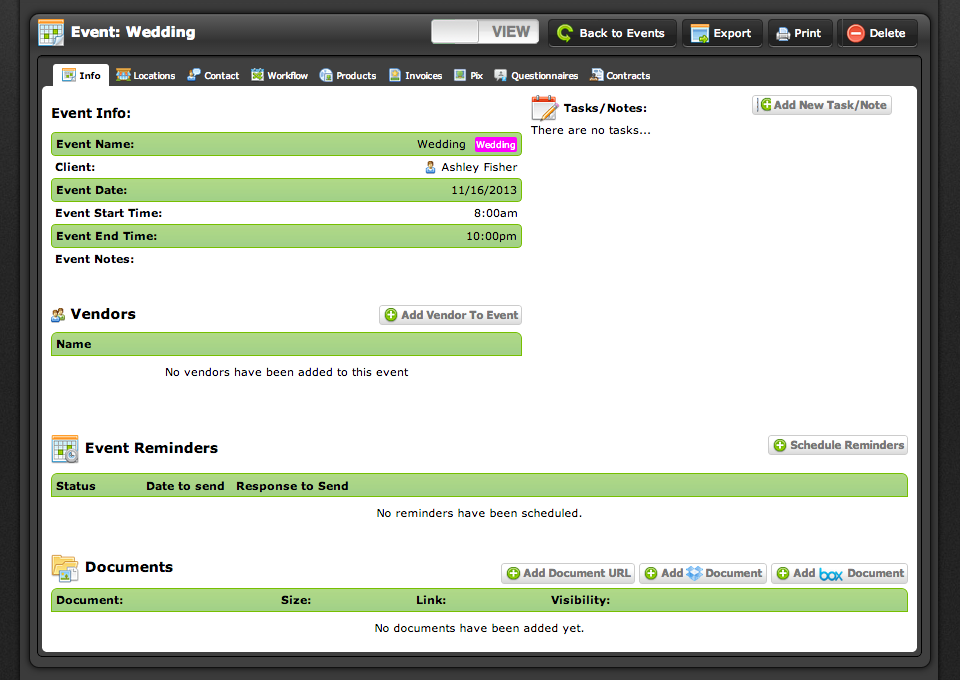
- Then you’re going to start making your way across the top (info-locations-contact-workflow-products-invoices-pix-questionnaires-contracts)
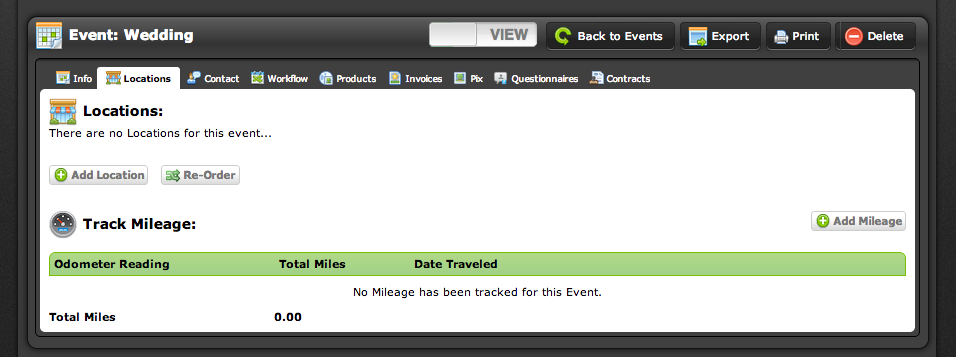
- Locations – you can add your locations that you’ve set up under templates, add new locations, and track mileage here.
- Contact – any correspondence that you’ve sent through pixifi will be listed here.

- Workflow – you can associate your workflow here, by clicking “associate workflow,” choose an existing workflow, and then select the starting phase and click save.
- Products – you can add any products associated to the event here.
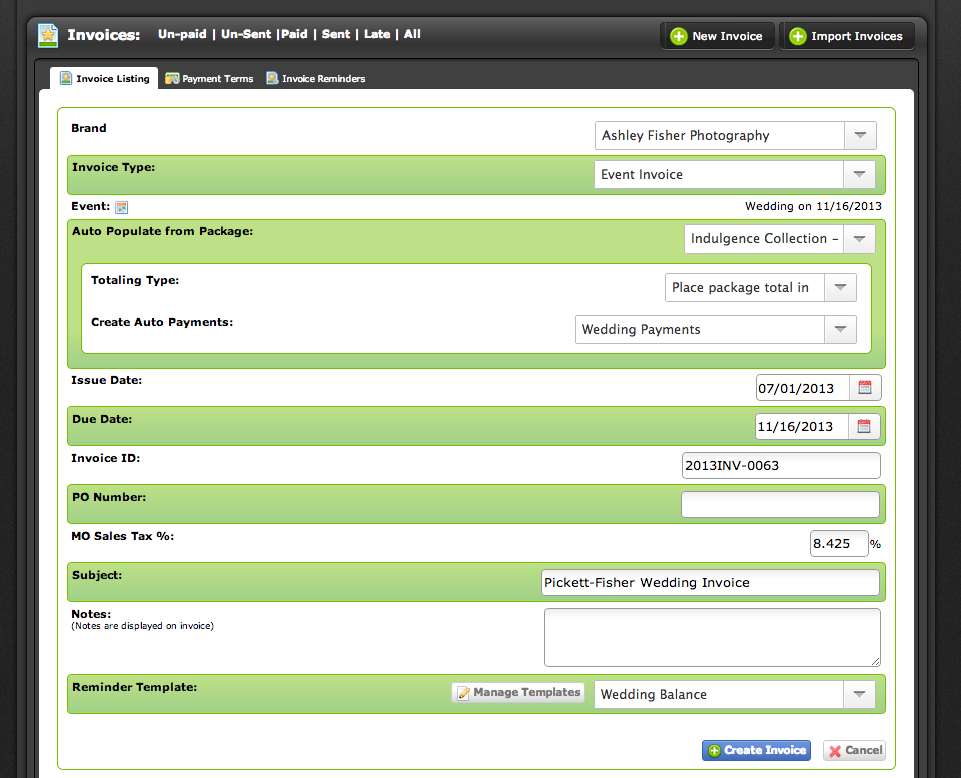
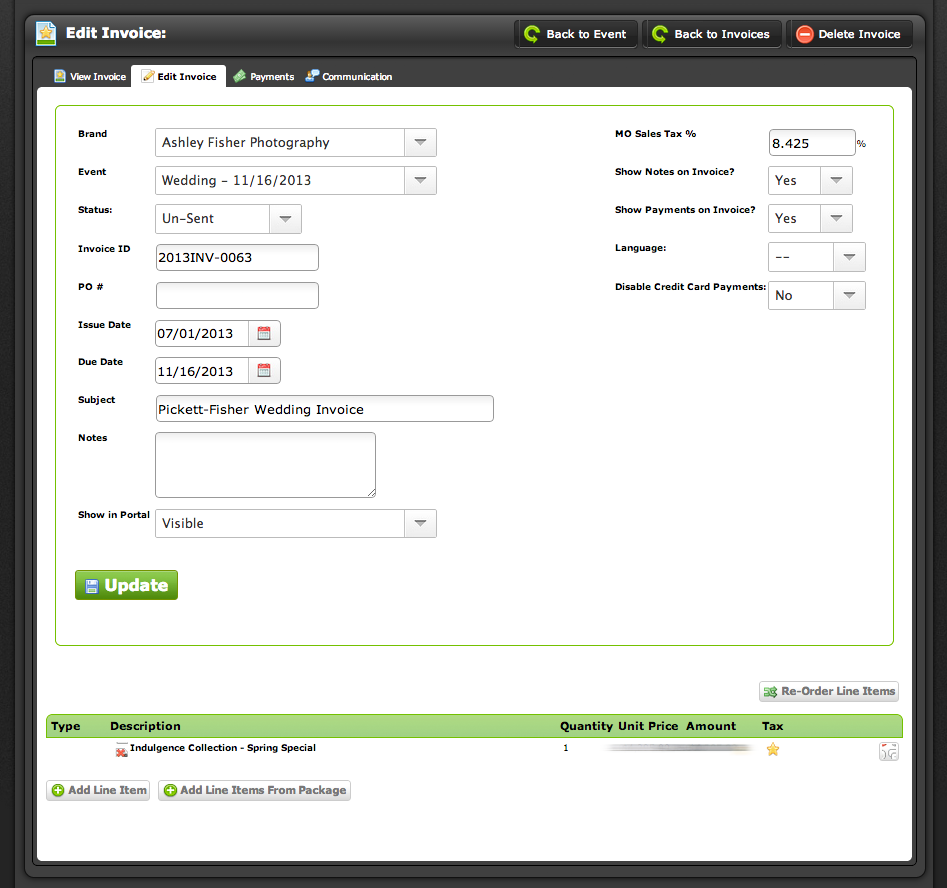
- Invoices – here’s one of the two critical parts to the booking. Click create new invoice in the top right corner. Make sure you select event invoice. The event should automatically populate. Select your package from the drop down. In totaling type, choose whichever works best for you. Choose your auto payments from the drop down. Issue date is the date you’re sending the invoice. Due date is the event date. PO number is blank, MO Sales Tax % should auto populate. Subject is usually bride-groom wedding invoice. Notes is blank unless you need to add something. And finally choose your reminder template from the drop down. Click create invoice. It will bring you to an edit invoice page. The only things on this page you may want to change are disable credit card payments if you don’t want to take cards and then if you need to separate your physical goods from your services/digitals for sales tax purposes, which you would do by adding a line item and applying sales tax only to those items. Click update. You’ll be able to view the invoice before you click “back to event” to continue the booking process.

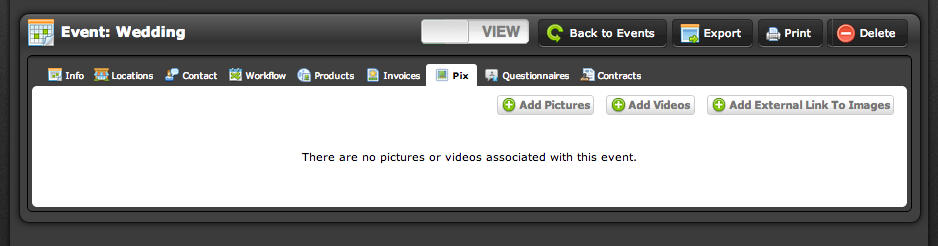
- Pix – here you can add pictures, videos, or links to external galleries (e.g., PASS)
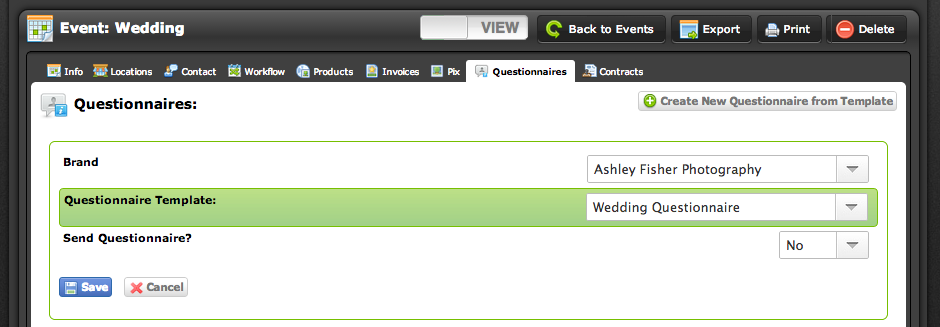
- Questionnaires – If you want to add a questionnaire, click create new questionnaire from template and select the template from the drop down. You can send the questionnaire right then or you can send it later. I always send later.
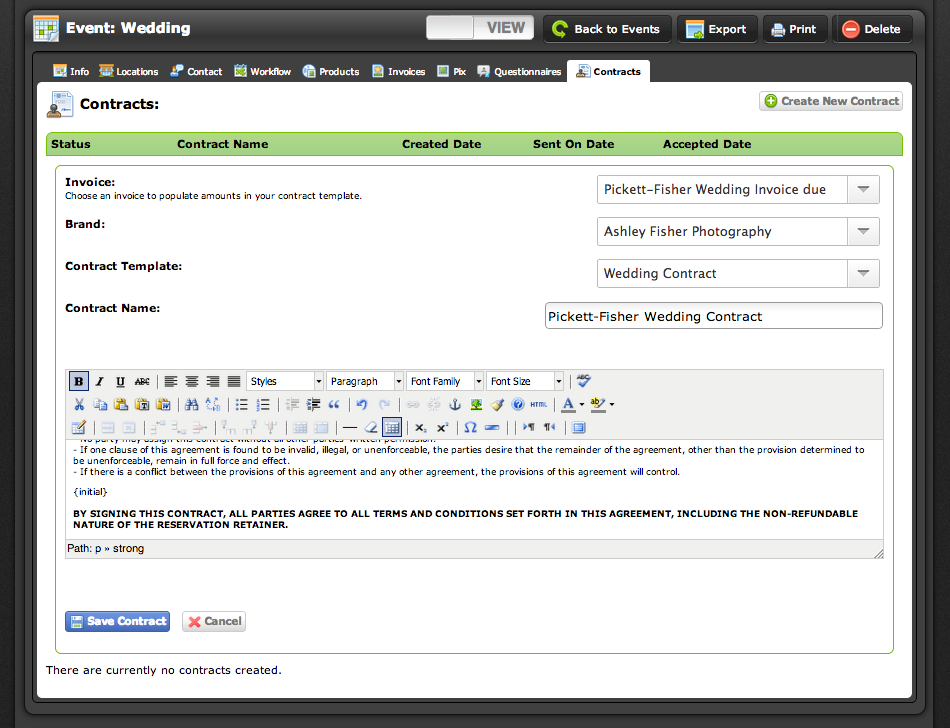
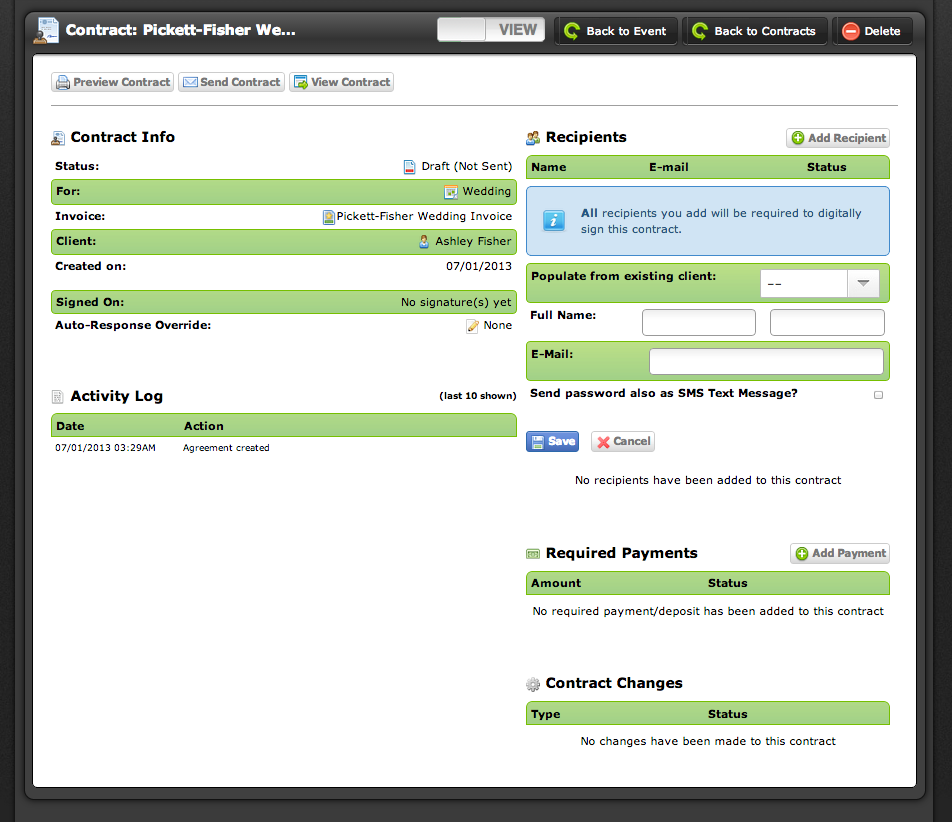
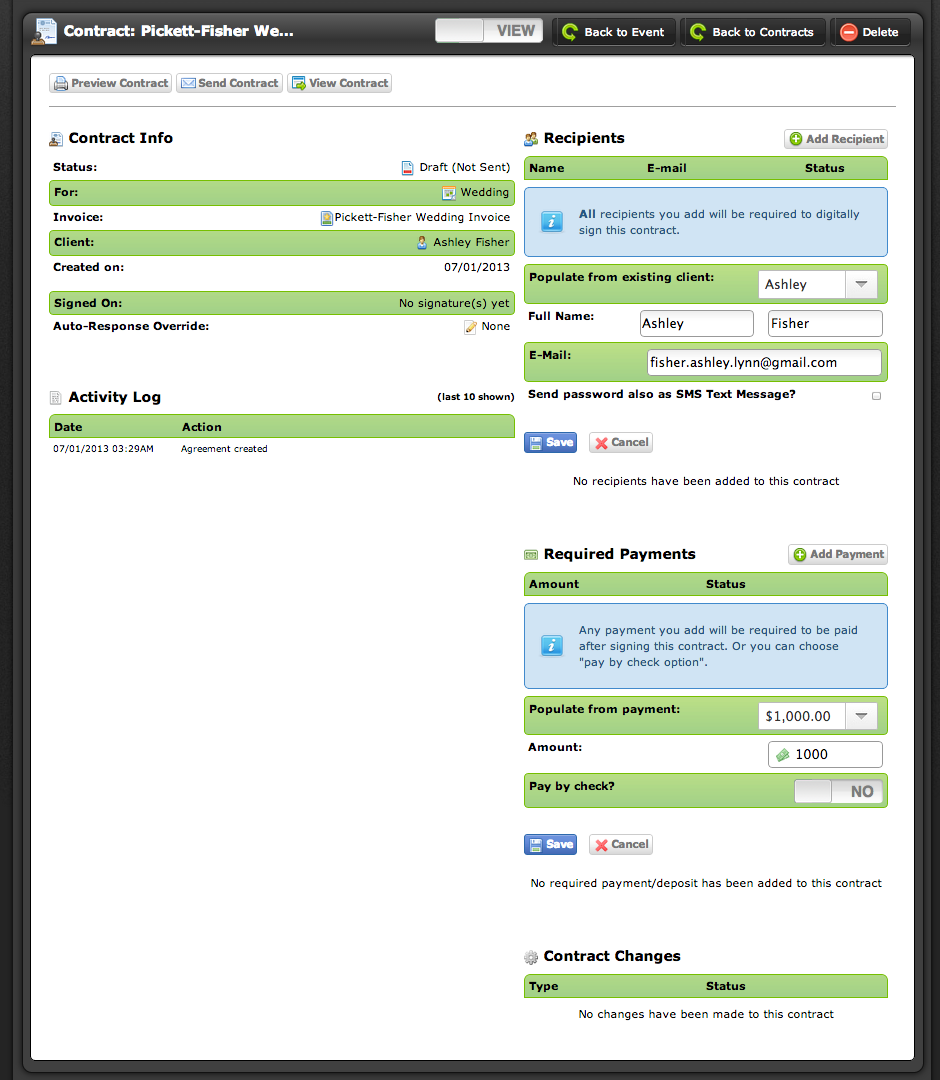
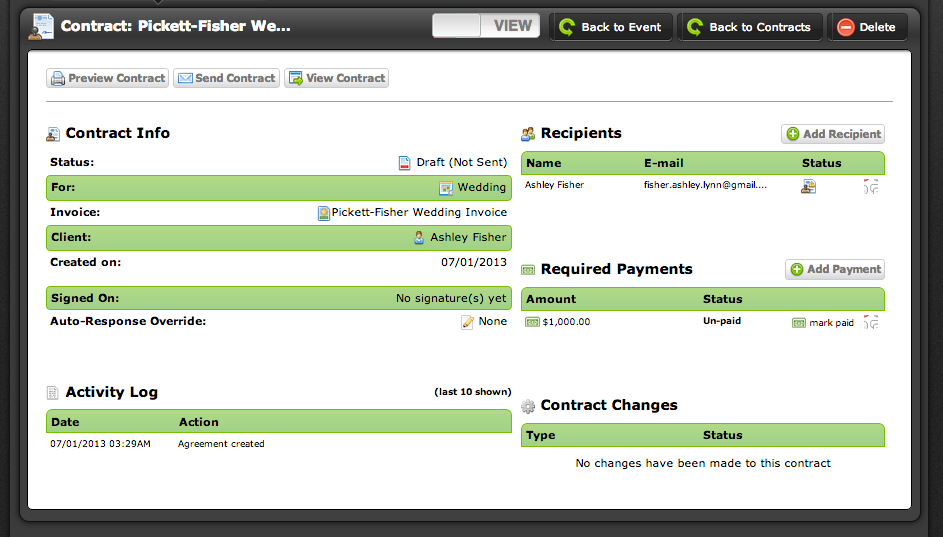
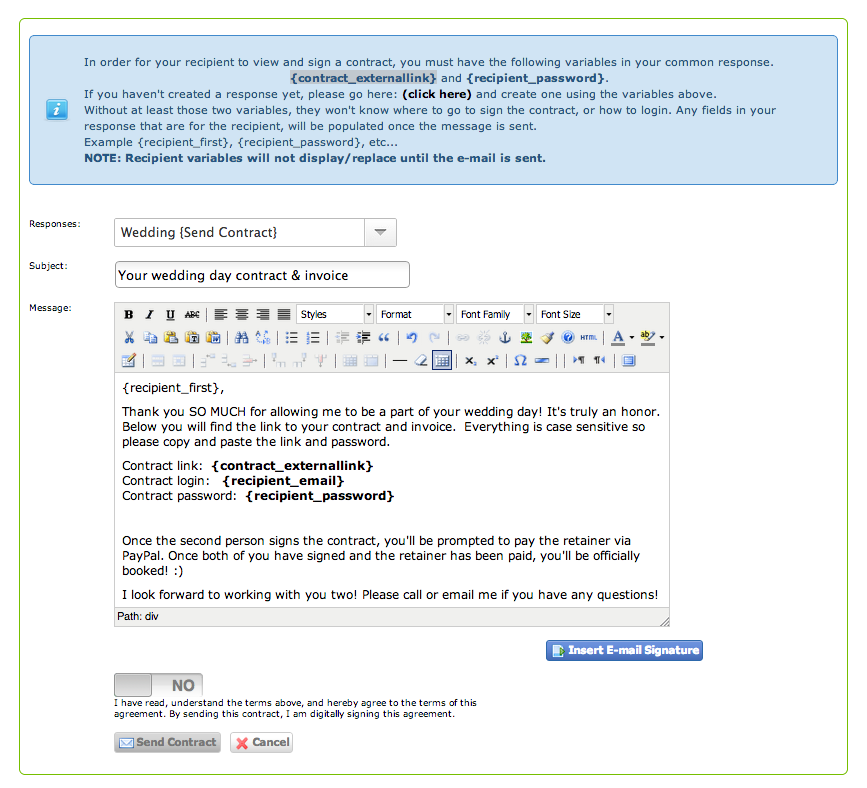
- Contracts – and finally, we’ve reached the last step! Click create new contract in the upper right corner. Attach the invoice for the event (should auto populate), choose your brand, choose your contract template from the drop down menu, and name your contract. Double check to make sure everything in the contract auto populated as it should, manually anything you might need to enter, and read it over before you click save contract. Edit contract now. Over on the right hand side, click add recipient. You’ll add both the bride and the groom by choosing the person from the “populate from existing client” drop down. You’ll have to click “add recipient” for each of the two clients and save after each one. Then you’ll click “add payment” and choose the retainer amount from the “populate from autopayment” drop down. Make sure the amount is correct, and decide whether you want to allow checks. I don’t allow checks, so I keep the pay by check slider on no. Click save. Once you’ve done both of those things, click “send contract” up top! If you haven’t created a common response, you’ll need to make sure to at least copy and paste the contract link + password link in the email. Once you switch the slider above “send contract” to yes, essentially signing the contract, and click send contract, you are DONE! You just wait for both clients to sign + pay their retainer. You’ll get an email notification once the contract has been accepted. 🙂
************************************
If you have ANY other questions after reading this EXTREMELY LONG blog post on Pixifi setup tips and advice, feel free to comment on this post, email me, or join the facebook group I mentioned earlier! I hope that you love Pixifi as much as I do! NOW ENTER THE GIVEAWAY!!! 😀

HILARIOUS! i actually signed up for pixify about six months ago and totally forgot the name of the software, couldn’t find it anywhere, so I never got into it before my trial ran out… I’d love to give it another shot – its so much less expensive than shootQ
I just quit my job last week to pursue photography full time! No system like this yet in place and would LOVE to give it a shot for free and get myself hooked on it (let alone convince the brand new husband of one month that pixifi is worth it! Thanks for the awesome awesome BLOG!
This is AWESOME! I just signed up for Pixifi about 2 weeks ago and have been FUMBLING around for answers on how to set this stuff up. THIS IS AMAZEBALLS. Thank you!!!!
I would love to win so I can give this an honest try and hope that it will help the business side of things even more.
I just quit my job last week to pursue photography full time! No system like this yet in place and would LOVE to give it a shot for free and get myself hooked on it! Thanks for the awesome awesome BLOG!
This sounds like an amazing tool! We’ve gotten busier and anything that can help on the backend would be fabulous.
I love Pixifi! It was on you recommendation that I switched from Shoot Q, the difference is night and day.
wow! love all the info. I’ve been thinking about pixifi and have seen it laid out like this. thank you so much!
This program seems so cool, would love to try it.
Wow! That is a helpful very in depth post. Thanks for all the information. 🙂
Haven’t heard of this…but would love to start it up! Looks a little confusing but also very beneficial, been looking for something like this for awhile!
Just been royally screwed over by SimplyStudio and desperately need a professional company to handle my client management! I just signed up for the Pixifi trial version, and cannot wait to get it all set up!
Thanks for this blog post as well, very helpful!
Great read, thank you! Have been considering Pixifi but never really taken the time to set it all up properly during my trial run. This will help immensely!
I’ve been looking at Pixifi for awhile and have heard so many awesome things about it! Thanks for the awesome giveaway and I really hope I win!
Very helpful thanks!
Wow! Thanks for this post, it is so full of helpful information. Pixifi seems like an amazing tool and my business could definitely benefit from being more organized. Thanks for the opportunity!
This is the most helpful information about Pixifi that I’ve been able to find! I’d love to get give it a test drive.
Thank you for sharing all the great information. Now, to go make good use of it!
Yay! I love Pixifi too!
Looks like exactly what I need to get me efficient and organized.. finally.
I would love to win this so I could really learn more about Pixifi and all it’s greatness! I really need a good way to help manage my business and I think Pixifi would be great for this!
I’m currently using ShootQ, and while I love having an online studio management system to help me keep track of my business, it does have some shortcomings. Pixifi seems to fill in the gaps — at a more affordable monthly rate — so I’m planning to make the switch anyway. This would just sweeten the deal that much more! 🙂
I have been taking on freelance photography jobs for nearly a decade now while working FT for a non-profit where photography is also part of my job. But I’ve been looking at expanding my freelance business and I really need something to keep me straight with managing the business because if I am going to grow, I need to make sure I am actually making money and not just covering expenses! And with having a split focus, I need help with client communications. And don’t get me started on contracts!! (Let’s just say, I am doing everything wrong!!) Help me, Pixifi!!
Looks like a great product! Thank you for the time and effort to put this out there to help educate us! Hope I win! 😉
I’ve been trying to decide on studio management software forever, but always put it off because they all seem so scary to setup. Your walkthrough is amazing!!! Thank you!
I signed up for Pixifi back in March and got so overwhelmed trying to set things up I just quit. I definitely want to get a solid system in place to help with work and this blog post is fantastic in helping with that. Thanks Ashley! I’d love the three free months because I have a feeling it’ll take me that long to get it all set up! I’m not exactly the most tech savvy person in the land.
Yes! Bring me serenity now!!! Fingers crossed on winning this AWESOME gift!!! Thanks for even offering it Ashley. As my favorite coffee mug declares… YOU ROCK! 🙂
This would be a huge help in my business..thanks for doing this Ashley!
This is excellent Ashley!!!
Love this walk through!
Sounds way cool! I would love to give it a try!
This would make a world of difference in my business! Thank you for sharing.
Thanks, Ashley! I realized I’m only using pixifi for about half of its capability. I’ll reference back here to get my responses and templates in order. 🙂
Wow, thank you for this post and for going through everything. It seems a bit overwhelming at first but I think the information is very helpful and valuable to get your business organized and on the right track. I’ve heard other photographers rave about Pixifi so it would be great to finally get on board 🙂 Thanks again!
We love using Pixifi. Tim really is a rockstar programmer and customer service guy.
Uhh…I know I’m a little late to the Pixifi party here on your blog but OH MY WORD this looks amazing. Sad I missed the giveaway but I have a tab up and I WILL be checking this out!
Wow! This must have taken a Looong time to prepare. What an amazing post! Thank you so much. I absolutely adore your site!
I don’t know if I missed it or not, but do you know if Pixifi allows you to send automated e-mails based on the client’s event date? For example, reminder e-mails to schedule a time to discuss details of a wedding or a reminder e-mail to pay the balance due? I know you can manually send these generated e-mails, but I’d love to be able to automate everything without having to remember to send the e-mails by a certain time.
Very helpful, thank you for taking the time to write this.
You don’t know how much this post helped me with the setup phase. Thank you so much for taking the time to put this together (especially the screen shots) to help out newbies like me! I was so lost in the beginning before I found your post!
Hi Ashley! Thank you for this wonderful and very helpful post – I was wondering if you had any interest in sharing or selling your pixifi workflow templates. I’ve been using pixifi and this is the one section I need to utilize more!
Thanks so much Ashley! I actually signed up for this program a couple of months ago but then a couple of people advised me I should go with Tave. I found their system a bit ridged and ugly to use I couldn’t view my financial year July – June (australia) so I thought I would give Pixifi a go. I felt a little overwhelmed with all of the options (something that put me off pixifi in the first place) but I went through your setup tips step by step and made it really simple.
It has been a HUGE help! Love your work.
Very helpful! Thank you! The glitter on your background is really distracting from your content – just thought I’d comment 🙂
So helpful!thank you!
[…] make our lives easier, and he’s always adding exciting new stuff! A few years ago, I wrote a blog post on setting up pixifi. A lot has changed since then, but this combined with the Pixifi Facebook Group, should help you […]
I know this post is old, but I just have to tell you that it was incredibly helpful to me while I set up my account! Thanks so much for sharing!
Thank you so much for all the wonderful information! I am about to try pixifi, and I will be using your tutorial a lot while I set it up! Thank you!!
Everything is very open with a clear explanation of
the challenges. It was really informative. Your
site is very helpful. Thank you for sharing!